The Camaro Club (UK)

Online Community for all Camaro Owners and enthusiasts
It is currently Sun Nov 24, 2024 8:33 am

All times are UTC


Post new topic Reply to topic  [647 posts ]  Go to pagePrevious1111213141565Next
Author Message
PostPosted:Tue Dec 06, 2011 4:42 pm 
Offline
Big Block

Joined:Thu Jul 21, 2011 2:16 pm
Posts:815
Car Details:1980 2nd Gen, 6.0 iron block LS, 4.11 12 bolt axle, Brute Strength Posi, Lowered 2", sub frame connectors, G-braces, Carbon hood and front bumper cover
Location:Norfolk
Today I went around the cowl area with seam sealer. Hopefully I havent missed anywhere, I dont want this thing leaking when I have finished! Then gave it another couple of spray coats of epoxy inside and out. Spraying let me get right into the hinge areas of the cowl as well. So hopefully thats got as much as possible coated.

Image

Image

Image

Also scuffed and sprayed the new cowl panels.

Image

Then started to remove the rear axle. To my suprise everthing came loose without many problems. One clip nut broke, but I had the floor cut away above that anyway.

Image

And the drivers side torque box looks good. Bar needing a coat of paint where I did the repairs a couple of months ago.

Image

Passenger side is good towards the front, which means it will be a little easier to replace the frame rail as I will have a good datum to work to.

Image

Thats all for today. Can't get a lot done in 7 hours of daylight :(

_________________
My '80 progress thread - hugger orange! Now with LQ9 power - forged pistons, LS2 rods, 236/242, .621/.612, flowed and milled 317 heads. MS3X

4L80e, 12 bolt, 4.11, Moroso brute strength posi, steel shafts.

Subframe connectors, g-braces, solid body bushes, carbon hood and front bumper, custom door cards, Autometer gauges.


Top
   

Re: '80 Camaro mod project...

Sponsor

Sponsor
 

PostPosted:Wed Dec 07, 2011 4:53 pm 
Offline
Big Block

Joined:Thu Jul 21, 2011 2:16 pm
Posts:815
Car Details:1980 2nd Gen, 6.0 iron block LS, 4.11 12 bolt axle, Brute Strength Posi, Lowered 2", sub frame connectors, G-braces, Carbon hood and front bumper cover
Location:Norfolk
Very cold and windy here today. Started off chancing welding the cowl shoulder panel on, but gave up after 10 minutes.

Instead decided to do some work in the garage with the doors firmly shut!

Herb Adams mod on the leaf spring mounts.

The old mounts were a bit manky, covered in the usual 30 years worth of filth and underseal. That said one of the 5/8" bolts holding the mount to the front bush was so loose it came undone with a ratchet and no force at all. :roll: The mounts also have about 1/4" sideways play on the crush tubes of the bushes. Will have to make some spacers up to go in there when I reassemble everything.

Just marked out the new holes, and where to cut the top of the mount away to clear the spring eye then sliced it with the trusty angle grinder.

Image

Image

Welded some 1/8" plate over the new holes to add a bit more strength to the bracket. Then gave them a coat of POR15.

Image

Image

Another job done.

This is the gap between the bushing and mount. They were like this fitted to the car...no wonder it handled a bit funny :roll:

Image

_________________
My '80 progress thread - hugger orange! Now with LQ9 power - forged pistons, LS2 rods, 236/242, .621/.612, flowed and milled 317 heads. MS3X

4L80e, 12 bolt, 4.11, Moroso brute strength posi, steel shafts.

Subframe connectors, g-braces, solid body bushes, carbon hood and front bumper, custom door cards, Autometer gauges.


Top
   
PostPosted:Wed Dec 07, 2011 4:59 pm 
Offline
Big Block
User avatar

Joined:Tue Sep 13, 2011 11:46 pm
Posts:202
Car Details:1985 camaro iroc z28 5.0 high output 5 speed manual LSD
Location:KENT
you are one busy little beaver my friend :clap: :clap: :clap: :clap: :clap:


Top
   
PostPosted:Wed Dec 07, 2011 6:35 pm 
Offline
Big Block
User avatar

Joined:Fri Mar 19, 2010 1:35 am
Posts:2566
Car Details:79' camaro road & track day toy. 383 stroker, 5 speed TKO trans, lots of suspension stuff, 13" Vette brakes, 18" wheels.
Location:Luton
I've still got to get to doing the Herb Abdams mod on mine, especially as I've got a spare set of front mounts I bought ages ago to drill out..
I've also got got the spherical steel bushes from PTFB to go in the front mounts too, just waiting to get round to it.

Interesting on the gap between the bush and the bracket though..

_________________
“You only live once, but if you do it right, once is enough.”


Top
   
PostPosted:Fri Dec 09, 2011 4:40 pm 
Offline
Big Block

Joined:Thu Jul 21, 2011 2:16 pm
Posts:815
Car Details:1980 2nd Gen, 6.0 iron block LS, 4.11 12 bolt axle, Brute Strength Posi, Lowered 2", sub frame connectors, G-braces, Carbon hood and front bumper cover
Location:Norfolk
Thanks :)

Apparently its not unheard of for the brackets to be loose on the bushes, easily fixed with some spacers anyway. :) The mod is simple enough, just measure about 6 times before doing any drilling :thumbup:

It was 4deg C here today :( But the weather held out so...

Fitted the new cowl shoulder panel

Image

Painted all the seams inside the cowl again with epoxy (plus I had some mixed up from something else, so figured it can't hurt!)

Then test fitted the cowl panel and marked out the positions for the spot welds. Also checked the fit of the screen and it fits nicely. Then drilled lots of holes in a nice new panel

Image

Then after lots of welding, grinding and swearing (mostly at the welder as it kept unravelling the wire today, I swear it's possessed :evil: !) the cowl panel was fitted, seams/joints coated with epoxy and the bare metal etch primed. Tomorrow I'll be going around all the seams with seam sealer so its ready for a top coat. Not sure what I am going to paint it with yet though.

Image

Image

And these are the new heads I picked up yesterday

Image
Image

A quick clean up, and check over then they should be ready to use.

_________________
My '80 progress thread - hugger orange! Now with LQ9 power - forged pistons, LS2 rods, 236/242, .621/.612, flowed and milled 317 heads. MS3X

4L80e, 12 bolt, 4.11, Moroso brute strength posi, steel shafts.

Subframe connectors, g-braces, solid body bushes, carbon hood and front bumper, custom door cards, Autometer gauges.


Top
   
PostPosted:Fri Dec 09, 2011 6:22 pm 
Offline
Big Block
User avatar

Joined:Tue Feb 23, 2010 12:40 pm
Posts:3245
Car Details:'79 Camaro, 350 V8
Location:South Bucks
Thanks for all the progress updates, it's coming along great! Putting many of us to shame lol, you'll be ready in no time! Great job on the cowel, looks brilliant!! What are you gonna do with the new heads, just clean, or any you going to do anything special?

Keep it up!! I feel bad for moaning now when working in the garage when it's 8 degrees and i have heater pointed at me lol

_________________
How to post pics: When writing a message, scroll down and use the "attach file" option. Where possible, a photo sharing service can be used such as Flickr, Imgur etc. The image location (usually ending in .jpg) can be copy and pasted between the ][ brackets that appear when you click the 'Img' button (you can find this button at the top of the message box).

How to post youtube vids: Click on the 'youtubeHD' button at the top of the message box and in the middle of the ][ brackets that just appeared, copy and paste everything from the youtube web address that appears after the = sign i.e if this is the url: https://www.youtube.com/watch?v=K2cNqaPSHv0 just copy "K2cNqaPSHv0").


Top
   
PostPosted:Fri Dec 09, 2011 6:42 pm 
Offline
Big Block

Joined:Thu Jul 21, 2011 2:16 pm
Posts:815
Car Details:1980 2nd Gen, 6.0 iron block LS, 4.11 12 bolt axle, Brute Strength Posi, Lowered 2", sub frame connectors, G-braces, Carbon hood and front bumper cover
Location:Norfolk
Thanks :thumbup:

Need to check what the springs are that are fitted to the heads and check they are suitable for the cam I want to use :) Other than that I'll be giving them a good clean up, lapping in the valves and might do some port work on them depending on what they are like once I have cleaned them up.

_________________
My '80 progress thread - hugger orange! Now with LQ9 power - forged pistons, LS2 rods, 236/242, .621/.612, flowed and milled 317 heads. MS3X

4L80e, 12 bolt, 4.11, Moroso brute strength posi, steel shafts.

Subframe connectors, g-braces, solid body bushes, carbon hood and front bumper, custom door cards, Autometer gauges.


Top
   
PostPosted:Sat Dec 10, 2011 8:13 pm 
Offline
Big Block

Joined:Thu Jul 21, 2011 2:16 pm
Posts:815
Car Details:1980 2nd Gen, 6.0 iron block LS, 4.11 12 bolt axle, Brute Strength Posi, Lowered 2", sub frame connectors, G-braces, Carbon hood and front bumper cover
Location:Norfolk
Seam sealed the cowl panel today, so its ready for top coat when the weather warms up (so that will be next year then!)

Then started cleaning up the plastic vent panel which had quite a few badly done coats of paint on it. Took ages, but its now bare plastic again. Might give it a light coat of satin black paint when I do the cowl, as its not in the best condition on close inspection. I know repro's are available, but then this isn't a show car.

As it was so cold, I decided to do some work inside, which mean making a start on the heads. Stripped the valves out, they all seem to be in good condition and are lightweight stainless items from what I can make out. Not sure what the springs are, they look like stock ones to me, so I'll probably change them for beehives while I am there.

Took a wire brush to the ports to see what had been done to them. Looks like they have just had most of the casting marks cut out with a carbide burr. No major reshaping that I can see...so thats another job to do.

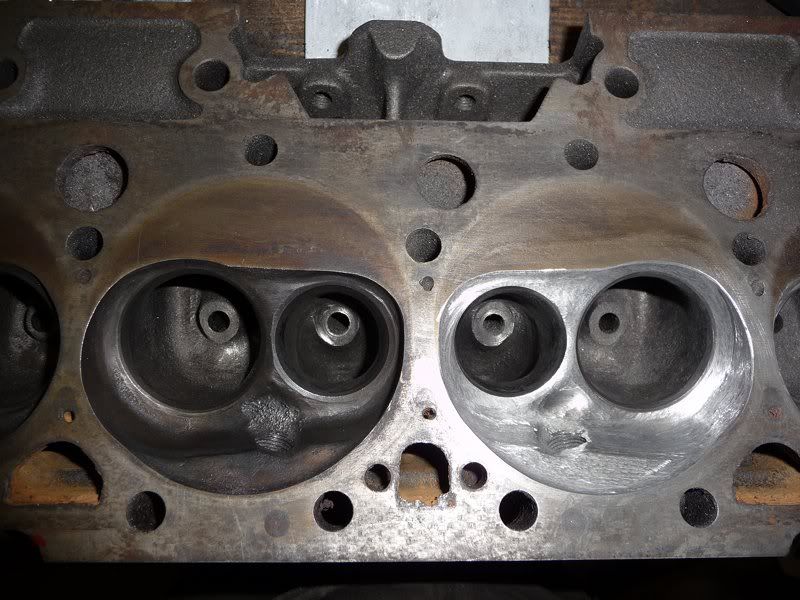
Started off with cleaning up the combustion chambers, deshrouding the valves and removing all the sharp edges. I am not going to the extent of polishing them, as there's bigger benefits to be had in some port and valve reshaping... Hopefully I will get on to some of that stuff tomorrow.

Heres a comparison shot
Image

Image

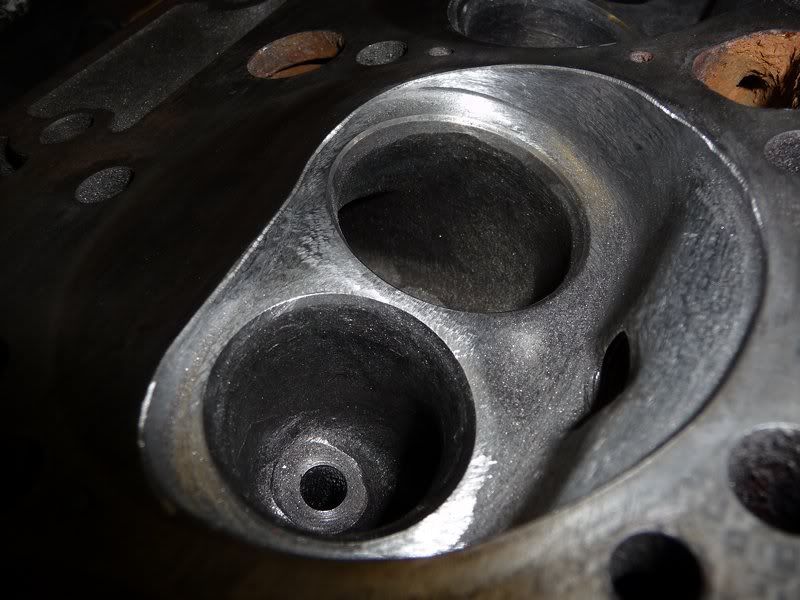
There is plenty of material to come out of the valve throats, this is the narrowest part of the port anyway, so the biggest gains are in opening that area out and blending into the valve seats, over any work closer to the manifold areas of the ports. I reckon its going to take about 8-10 hours per head. But we will see how it goes tomorrow. :)

This will be the first set of SBC heads I have ported, but I have done several other engines in the past with decent enough results so we'll see how I get on with these. :lol:

_________________
My '80 progress thread - hugger orange! Now with LQ9 power - forged pistons, LS2 rods, 236/242, .621/.612, flowed and milled 317 heads. MS3X

4L80e, 12 bolt, 4.11, Moroso brute strength posi, steel shafts.

Subframe connectors, g-braces, solid body bushes, carbon hood and front bumper, custom door cards, Autometer gauges.


Top
   
PostPosted:Sun Dec 11, 2011 5:53 pm 
Offline
Big Block

Joined:Thu Jul 21, 2011 2:16 pm
Posts:815
Car Details:1980 2nd Gen, 6.0 iron block LS, 4.11 12 bolt axle, Brute Strength Posi, Lowered 2", sub frame connectors, G-braces, Carbon hood and front bumper cover
Location:Norfolk
I havent opened the actual ports out at all. All the material was removed in the valve throat directly under the valve seat itself. Basically took it out to around 1mm under the diameter of the valve seat, then blended into the seat with a radius. The poor mans 3 angle seat. :lol: Then just blended the short turn back in again as best possible. Finished off with a 60 grit roll.

Annoyingly I seem to have misplaced my 8mm carbide ball burr, so didn't get as far as slimming down the valve guides. But I'll get another one this week so I can do that next weekend.

Cleaned up the valves, one of the many uses for a lathe I guess. :lol: Some of the inlet valves are quite pitted, not sure whether to replace them or not.

After that, lapped in the exhaust valves, a job made quicker with a cordless drill :lol: Next thing to do is put the valves back up in the lathe and put a nice chamfer on the back face behind the seat and radius the front face.

Image

Image

Image

Image

Image

_________________
My '80 progress thread - hugger orange! Now with LQ9 power - forged pistons, LS2 rods, 236/242, .621/.612, flowed and milled 317 heads. MS3X

4L80e, 12 bolt, 4.11, Moroso brute strength posi, steel shafts.

Subframe connectors, g-braces, solid body bushes, carbon hood and front bumper, custom door cards, Autometer gauges.


Top
   
PostPosted:Fri Dec 16, 2011 6:05 pm 
Offline
Big Block

Joined:Thu Jul 21, 2011 2:16 pm
Posts:815
Car Details:1980 2nd Gen, 6.0 iron block LS, 4.11 12 bolt axle, Brute Strength Posi, Lowered 2", sub frame connectors, G-braces, Carbon hood and front bumper cover
Location:Norfolk
Continued on the heads this afternoon. Nearly finished the grinding now. 3 more inlet ports to do. Then just finishing with emery rolls.

The last bits I wanted to tidy up were the valve guide bosses. And as my new burr arrived yesterday I was able to crack on with it. I can't really feel my hands now though and my compressor has been running flat out trying to keep up :lol:

The exhaust guide bosses are pretty chunky

Image

Slimmed them down a bit. Not removed anything off the lengths of these at all.

Image

The exhaust ports only took a couple of hours.

Then moved on to the inlets, these are taking quite a long time as there is a fair bit of metal around the guides that just needs blending in.

Again they start off pretty chunky

Image

And the finished shape

Image

Hopefully that will pay off a bit :)

Ordered some new inlet valves and a set of rods this week. Though they won't be here until after Christmas now I expect.

_________________
My '80 progress thread - hugger orange! Now with LQ9 power - forged pistons, LS2 rods, 236/242, .621/.612, flowed and milled 317 heads. MS3X

4L80e, 12 bolt, 4.11, Moroso brute strength posi, steel shafts.

Subframe connectors, g-braces, solid body bushes, carbon hood and front bumper, custom door cards, Autometer gauges.


Top
   
Display posts from previous: Sort by 
Post new topic Reply to topic  [647 posts ]  Go to pagePrevious1111213141565Next

All times are UTC


Who is online

Users browsing this forum: No registered users and 6 guests


You cannot post new topics in this forum
You cannot reply to topics in this forum
You cannot edit your posts in this forum
You cannot delete your posts in this forum
You cannot post attachments in this forum

Search for:
Jump to:  
cron
Powered by phpBB® Forum Software © phpBB Limited