The Camaro Club (UK)

Online Community for all Camaro Owners and enthusiasts
It is currently Fri Nov 01, 2024 10:34 am

All times are UTC


Post new topic Reply to topic  [456 posts ]  Go to pagePrevious1234546Next
Author Message
PostPosted:Thu Mar 11, 2010 4:49 pm 
Offline
Big Block

Joined:Mon Oct 05, 2009 10:00 pm
Posts:122
Car Details:tube framed 68 camaro
Location:WHITEHAVEN, CUMBRIA
yellow does it for me, i painted a mates trans am yellow about 8 years ago, and the 2nd gen shape really suits it.......as long as you go for a nice "shouty" yellow !!! :thumbup:

_________________
I KNOW WHERE YOU LIVE......

Image

I'M JUST TOO DAMNED TIRED TO BOTHER CHASING YOU !


Top
   

Re: 79 project - help needed with seats, dash, gauges and dash

Sponsor

Sponsor
 

PostPosted:Mon Mar 15, 2010 9:40 am 
Offline
Big Block
User avatar

Joined:Mon Feb 09, 2009 12:41 pm
Posts:2451
Quote:
Hi Nige,

Always full of tips you are, thank you for sharing :) I will look at PPG's catalog alongside a couple of others you mentioned. I keep trying to convince myself that's its only going to be slightly more incremental to step up to a House of Kolor pearl but i somehow don't see it happening :)
I'm actually just waiting on a new air compressor to arrive, should be coming tomorrow. thinking of changing the spray gun too, it's a devilbliss i've used before but it's suction fed so looking at gravity fed ones instead. Red and black stripes.. wonder what on earth you could be looking at :)

So for those digital dashes, i've included a pic below incase anyone wonders what i'm on about. After looking through real steel's catalog i'm more tempted by regular gauges that fly around the dash. You're right as you said about the muscle car look, wouldn't make too much sense having one in there.

I'm pretty sure i want to strip it to bare metal. I think that if there are already 3 coats of paint on there, there's an improved chance of a weak chain when it comes to chemical reactions. Plus there are a few small dings here and there, very unnoticable but might aswel smooth them out. I found some discs that go straight onto an angle grinder that will do the trick, however they recomend putting some paint stripper on there otherwise you run the risk of heating up the panels. I'm trying to find paint stripper but there's a lot of choice out there, none that i've found specifically for cars (in the UK anyways). Halfords do one, can't remember it's name but it said it's for most metals and woods. My search continues for that also.

The air shocks actually came with the car adn the ride was pretty decent when i drove it home (120 odd miles) but the more and more people i speak to, the more i hear they aren't great. I probably will do a suspension overhall at the end of the year when the weather starts to turn and the shows die down, still leafs on the rear so would be nice to get an all round adjustable set. Then after that will be the brakes, depending how close to zero my bank account is by then :)

Good thought on the headliner, i'm gonna have to give this one more thought. It's a the bottom of the list right now. Actually, thinking about the to do list, i will need to do some welding to make some minor repairs (few small holes will be made as you will see in the pic below). I already have a mig welder but am not sure what type (thickness) of metal to use and where i could get hold of some from. Have you any ideas?

And here, apologies for posting later than originally menioned, are the pics of the car:
To be honest the House of Kolor colours are very nice, I painted my blown Model A hot rod with it, but it can be a bit of a bitch to match up if you were to ever have a problem with rust or damage.

With the compressor, remember to fit an inline regualtor & water trap, never paint anything without a water trap inline (I've got 3 hooked up in my air system). Aldis are selling some at the moment quite cheaply (19.99 I think, offer finishes Thursday), maybe put a couple of them in line. Always rememebr to drain the compressor & water traps before using it, or at the end of each day & leave the drain plug open 'til the next time you use it.

Why do you want to change your spray gun?? De Vilbiss are pretty much the Rolls Royce of guns. The finish is dependant on the aircap/needle used not the difference of gravity & suction action.

As for paint stripper I'd go to your local "car paint supplier" who will have the heavy duty stuff that bodyshops use, plus it'll be cheaper than Halfords. If you scratch the paint up first with a sharp blade the stripper will penetrate much quicker through the layers of paint, & then scrape it off with a wall paper scraper. Remember not to allow it to get into the door/bonnet/boot edges ;)

Metal thickness should be around the .9mm or 1mm. Look in your yellow pages for metal suppliers. If you don't need a lot then most will allow you to rummage through their waste skip for off cuts. Failing that buy a sheet of the stuff, it's always useful.

Hope that helps,

cheers....Nige

_________________
Too much power...not enough hands!!


Top
   
PostPosted:Sun Mar 21, 2010 9:07 pm 
Offline
Big Block
User avatar

Joined:Tue Feb 23, 2010 12:40 pm
Posts:3245
Car Details:'79 Camaro, 350 V8
Location:South Bucks
Thanks again for the tips Nige,

Good shout on the colour, it will be block so i've got a quote from brown brothers for PPG paints coming in at about £450 for Epoxy primer, high build primer, colour, then lacquer. I've been desrusting the interior today with angle grinder + drill head fitting poly discs which have been doing a pretty good job at cutting off the rust and pulling off the paint. So far the drivers side is done (almost) then onto pass side then rest of cabin which looks pretty ok as it is. Couple of holes and gaps that i just got some off cut sheet metal for, got both 1mm and 1.5mm incase any stronger bits need doing. So for the interior it will be mostly bare metal hence the need for epoxy primer. I'm debating whether or not to take the whole car to bare metal before painting, it seems like a lot of work if it doesn't need doing.. the exterior paint is good with only 1 rust spot. Think im gona stick with a shade of red though :)

I was thinking of changing the gun as most people i've seen tend to use gravity fed, i've had the suction fed DevVilleBliss one for quite a few years now and thought maybe i'd be better off with suction fed. I'm not too sure what the aircap/needle is, haven't had a look but i'd assume it's what would come as standard with their range, so i'll find out this week. thanks for the hint on the water trap, Brown brothers are going to supply me with a couple when i pick up the paint, should be in a couple of weeks. Have taken some pic for you guys, will upload soon as i get them off the cam :)

Cheers!!

_________________
How to post pics: When writing a message, scroll down and use the "attach file" option. Where possible, a photo sharing service can be used such as Flickr, Imgur etc. The image location (usually ending in .jpg) can be copy and pasted between the ][ brackets that appear when you click the 'Img' button (you can find this button at the top of the message box).

How to post youtube vids: Click on the 'youtubeHD' button at the top of the message box and in the middle of the ][ brackets that just appeared, copy and paste everything from the youtube web address that appears after the = sign i.e if this is the url: https://www.youtube.com/watch?v=K2cNqaPSHv0 just copy "K2cNqaPSHv0").


Top
   
PostPosted:Mon Mar 22, 2010 10:59 am 
Offline
Big Block
User avatar

Joined:Mon Feb 09, 2009 12:41 pm
Posts:2451
Quote:
Thanks again for the tips Nige,

Good shout on the colour, it will be block so i've got a quote from brown brothers for PPG paints coming in at about £450 for Epoxy primer, high build primer, colour, then lacquer. I've been desrusting the interior today with angle grinder + drill head fitting poly discs which have been doing a pretty good job at cutting off the rust and pulling off the paint. So far the drivers side is done (almost) then onto pass side then rest of cabin which looks pretty ok as it is. Couple of holes and gaps that i just got some off cut sheet metal for, got both 1mm and 1.5mm incase any stronger bits need doing. So for the interior it will be mostly bare metal hence the need for epoxy primer. I'm debating whether or not to take the whole car to bare metal before painting, it seems like a lot of work if it doesn't need doing.. the exterior paint is good with only 1 rust spot. Think im gona stick with a shade of red though :)

I was thinking of changing the gun as most people i've seen tend to use gravity fed, i've had the suction fed DevVilleBliss one for quite a few years now and thought maybe i'd be better off with suction fed. I'm not too sure what the aircap/needle is, haven't had a look but i'd assume it's what would come as standard with their range, so i'll find out this week. thanks for the hint on the water trap, Brown brothers are going to supply me with a couple when i pick up the paint, should be in a couple of weeks. Have taken some pic for you guys, will upload soon as i get them off the cam :)

Cheers!!

If you're going for a non pearl or metallic colour like red then you could probably save some money on paint by spraying it solid red 2K instead of basecoat & lacquer. The paint on mine isn't lacquered, just solid colour as from the factory. To be honest you'd be hard pressed to tell the difference between a solid colour finish & a lacquered finish. Take a look at the pics of my 1st gen, you wouldn't know it's not lacquered

http://www.classiccamaroclubuk.com/phpB ... f=11&t=151

If the body work of the car is in good condition then it really is a toss up between sealing & painting over the existing paint or whether to bare metal it. At the end of the day only you can make that decision, but a bare metal paintjob gets expensive on materials & is very time consuming as every repair that car has had in its life will have to be re done.

If the car is in good condition I'd be inclined to carry out any remedial repairs, flat it down, seal the existing paintwork & paint it, that way you can get it back on the road before the Summer & enjoy it. If it starts to rust up in places in the future you can just carry out small remedial repairs to the affected areas. Far too often people will strip a car down to its last nut & bolt, strip off the paint, all with the greatest of intentions, but for one reason or another are unable to finish the car to the standard that they'd like, either due to a lack of skills, time or money.

My own car is a case in point. The previous owner spent an absolute fortune on parts for it & stripped it down to a completely bare shell. Only at this point did he realise that the time & money to complete it were beyond his means. The stripped car sat in his garage for years, with interest in it slowly dwindling away as other more important "life issues" came & went. Eventually he decided to sell it, but there were no takers as the majority of people won't take on such a mammoth task that someone else has started. I eventually bought it very cheaply with him, unfortunately, being well out of pocket.

As I said the decision is yours, but think long & hard about what you're undertaking, as i'd hate to see yet another persons dreams being shattered. Do you have the time?? (mines taken a number of years to get where it is now & I'm a fully skilled bodyman, used to doing this sort of thing. I put in an average of 20-30 hours per week of spare time). Do you have the funds to finance it??, whatever you think it's gonna cost double it. Do you have the commitment to see it through to the end, when life gets in the way?? I Don't mean to be doom & gloom here, but having seen people fall into the above "traps" I'd hate to see it happen to someone who seems as keen as you do :thumbup:

There is no "standard" De Vilbiss gun as they market a large variety of guns for different purposes. I use a De Vilbiss JGA (suction) set up for painting 2K. I've another gun set up for basecoat & another for primer. I also have A HVLP gun (high volume low pressure ). Depending on what application I'm doing will detemine which gun I use. Being old school (ie been painting for 30 plus years :lol: ) I prefer to use a suction feed gun as it feels more balanced. That's not to say that gravity feed aren't any good, it's just my preference. Assuming you have 2 guns set up the same there will be no difference in the finish between a gravity or suction feed. Ideally you'd want something with a 1.3mm or 1.4 mm air cap, this would give you a pretty good all round capability.

hope that helps.,

cheers...Nige

_________________
Too much power...not enough hands!!


Top
   
PostPosted:Tue Mar 23, 2010 11:21 am 
Offline
Big Block

Joined:Mon Dec 22, 2008 10:53 am
Posts:306
Car Details:'68 Camaro
'89 Golf Rallye
'97 Golf GTi (Daily)
Location:SE London/Kent
Hi Ray,

The Dakota digital dash looks great, certainly better than the design of the original one, but it's your car, and you should go with what you want, regardless of other peoples thoughts :) unless of course someone comes along and says that Dakota dashes are unreliable junk :lol: Although I am not going for digital, my 1st Gen will have Autometer guages (inc speedo and tach) - so not original.

Seat wise, as already mentioned, plenty of options - if you have a car trimmer nearby, they should be able to recover your existing, or any new seats to match the rest of the interior.

Your colour options are very nice, (but again, only my own opinion), you should lose the single stripe, does not suit it (unless you've seen a Trans Am racer with it on, then there's no argument :lol: )

I think (not checked) Marquez Design may be the fibreglass headliner you are thinking of, I know they do one for a first gen. They do very nice products.

Suspension wise, well, again loads out, loads of opinions, it all depends on what you want from the car :) If you want to stick with air, then Ridetech are the people to approach...air has come a long way... it's something I've considered for my 1st gen, but not that far into the project at the moment!

Anyway, car looks great, look forward to seeing what you decide to do :)

Cheers,
Mark

_________________
'68 Camaro


Top
   
PostPosted:Tue Mar 23, 2010 12:10 pm 
Offline
Big Block
User avatar

Joined:Mon Feb 09, 2009 12:41 pm
Posts:2451
Hi Mark, how ya doing mate? how's the car coming along, is it painted yet? look forward to more pics

cheers...Nige

_________________
Too much power...not enough hands!!


Top
   
PostPosted:Mon Mar 29, 2010 12:58 am 
Offline
Big Block
User avatar

Joined:Tue Feb 23, 2010 12:40 pm
Posts:3245
Car Details:'79 Camaro, 350 V8
Location:South Bucks
Can't believe it's been a week already!
Thanks for your replies and advice.
I took your advice Nige and got a quote for PPG 2 pack paint, epoxy primer and 2k primer. As i won't be doing a "fancy" paint job you're very right to stick with standard paint. Had a look through your camaro project again, amazing what you've done!! You truly are an artist and it's a shame people aren't getting your quality of work since selling up your shop.

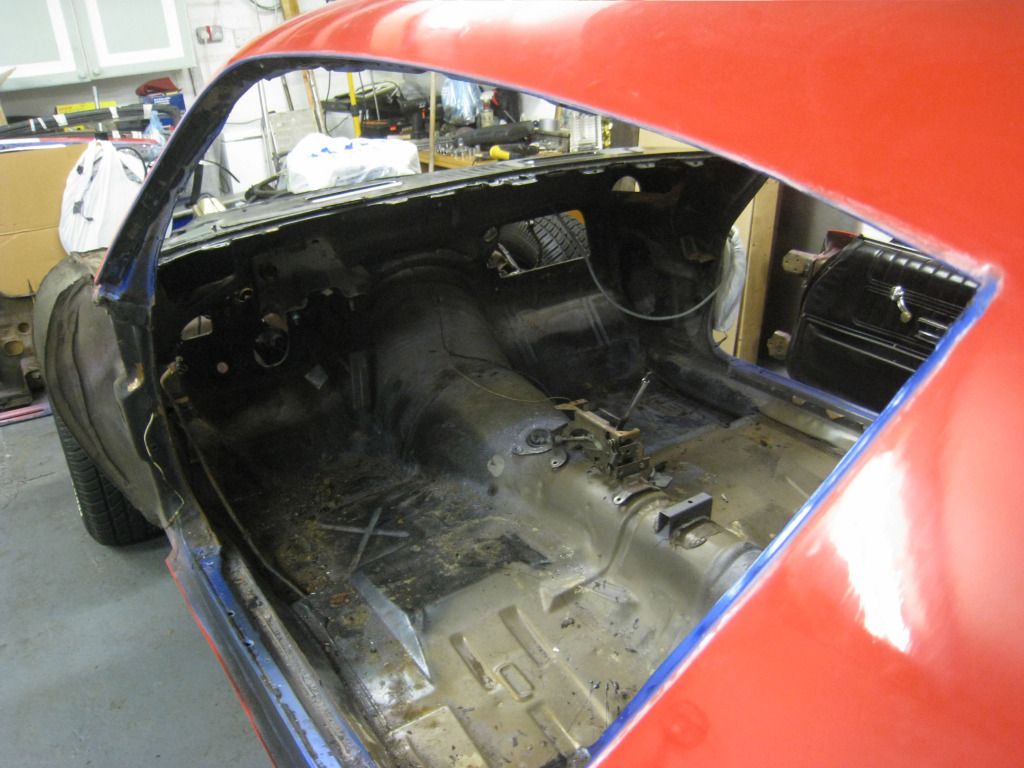
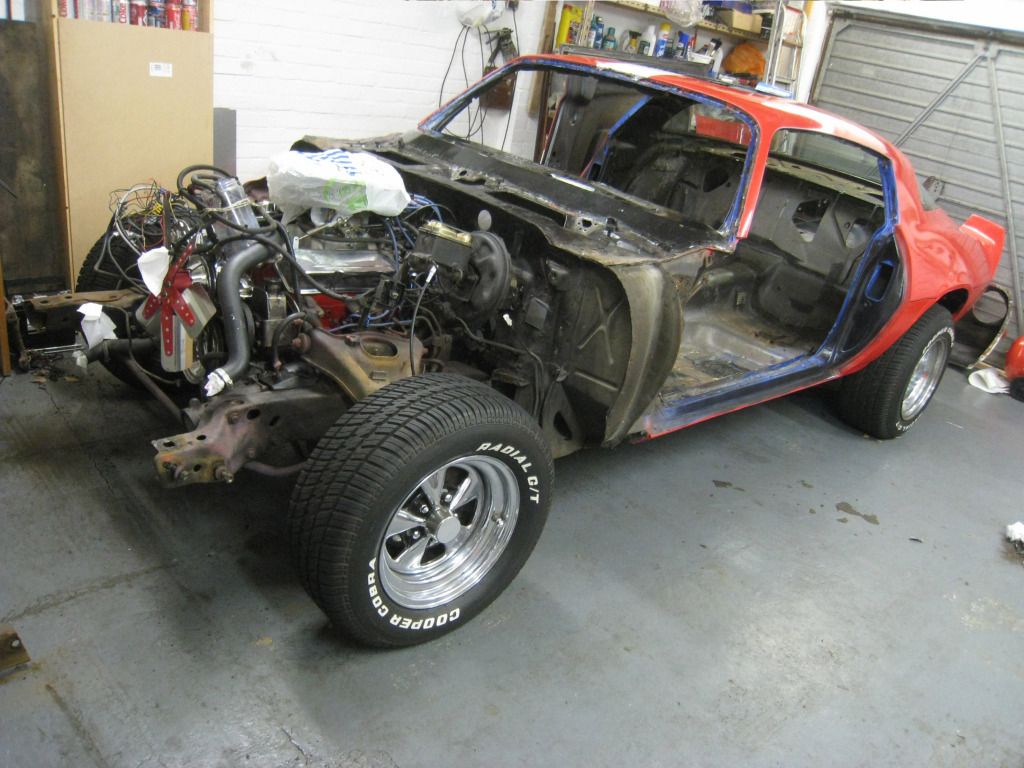
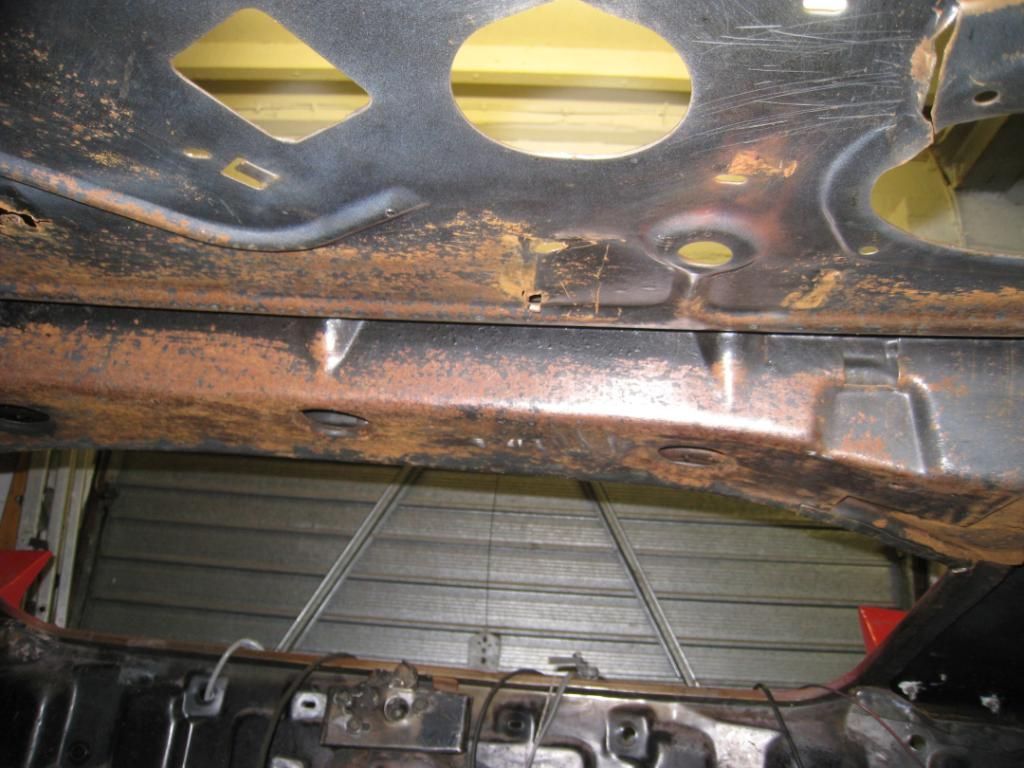
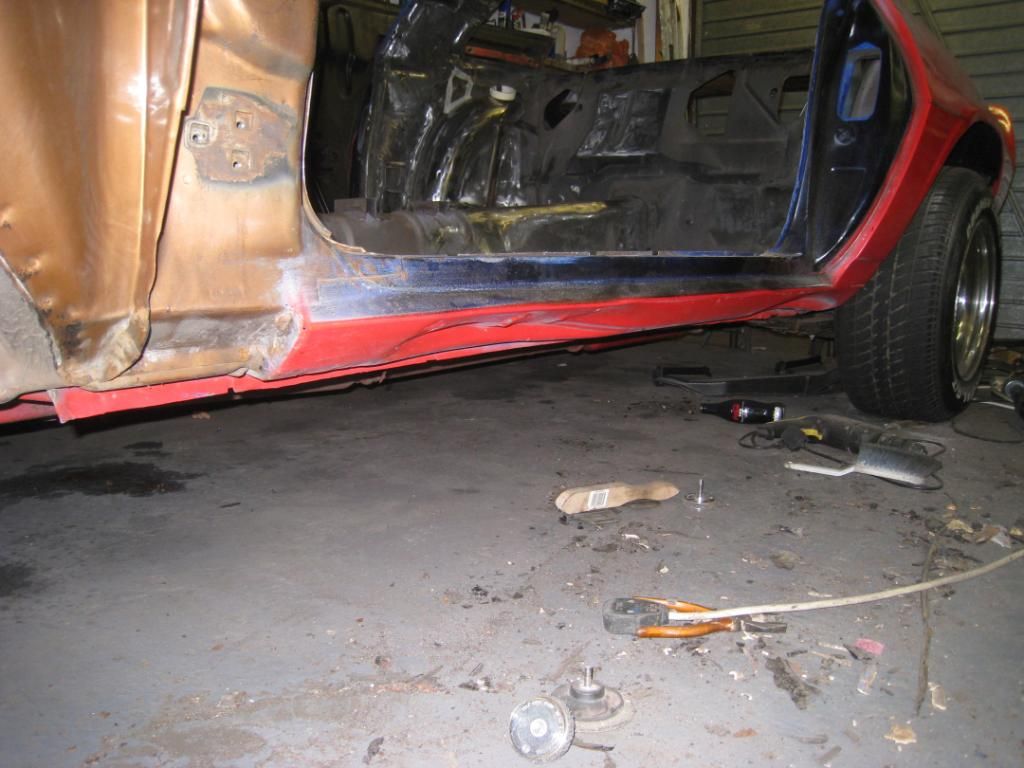
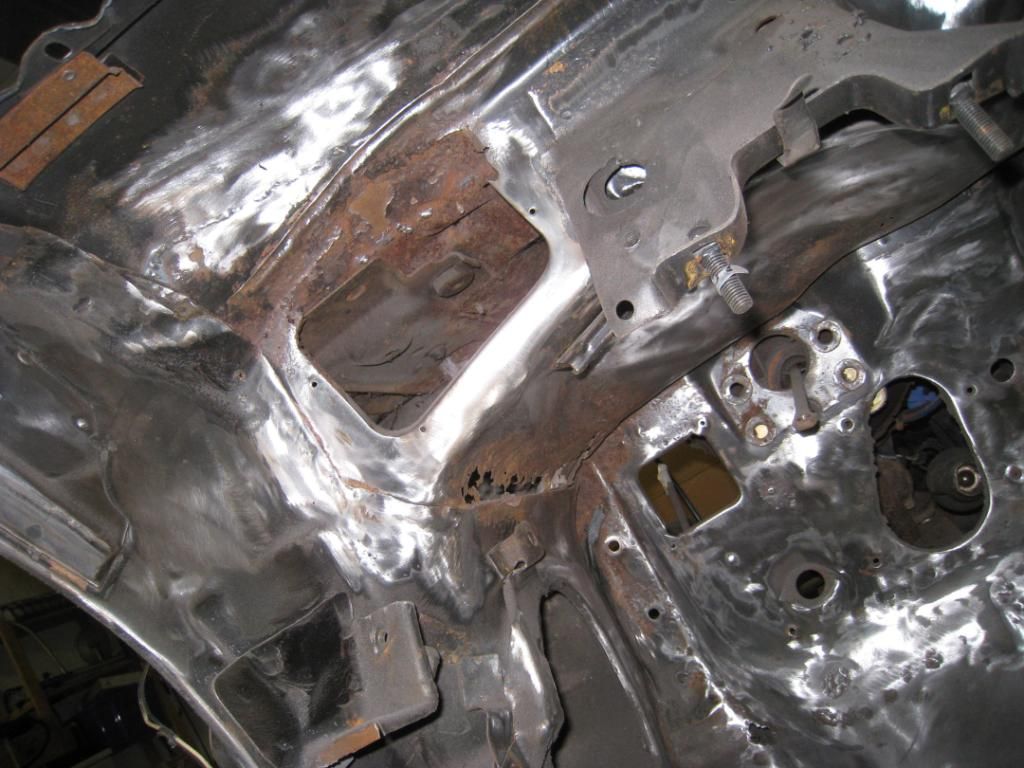
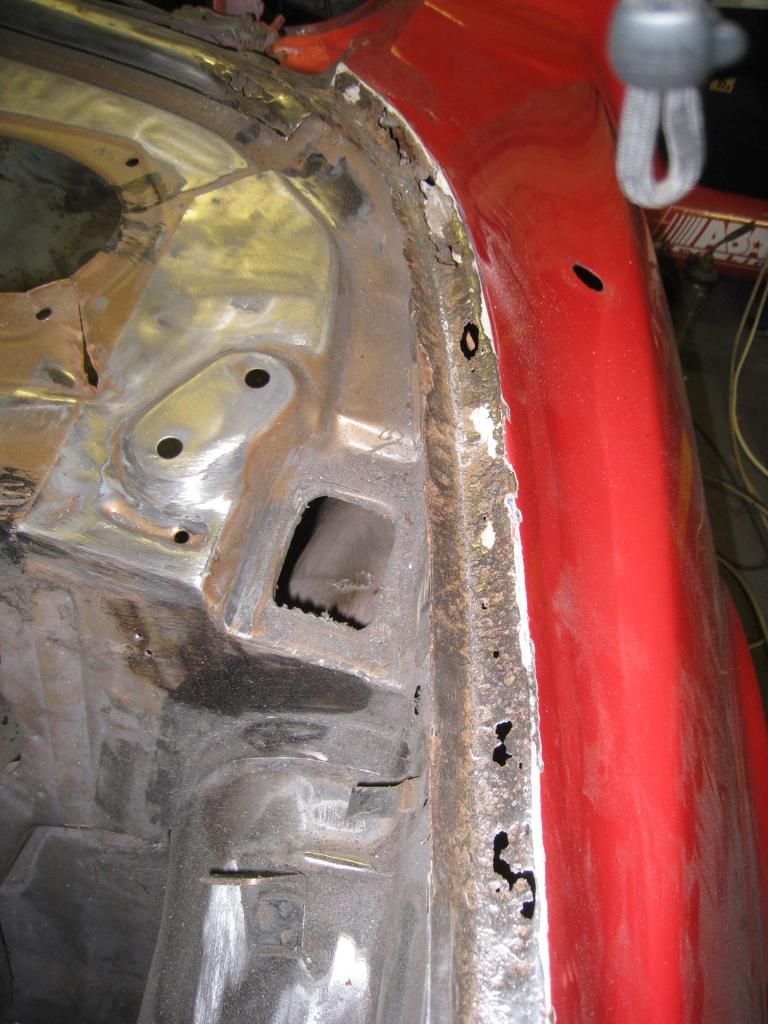
So as the project stands up to this weekend, the interior is 90% bare metal, just some of the roof left. Pretty much every part of each panel that had an abrasive disc put to it had underlying rust. I've been on the rust since last Sunday, working every evening and all this weekend, just the boot to go (and some of the engine bay items such as radiator mount etc). Got some Bilthamber deoxgel to put on the interior and remaining parts. Brings me to your next point, as per your advice, i won't be baremetalling the rest of the body. It's in good shape, i know it's had bits of filler here and there an i don't want to be redoing as you said. The interior has really taken it out of me, knakered! Gone through many an abrasive disc and they aint the cheapest so my wallet is also a bit knakered :)

Thank you for the warning and advice about the project and how far to take it. No gloom and doom by any means, you've seen it happen many a time by the sounds of it and i'm glad you've said what you did as i think it's saved me from going down that path. I sit here typing, my morale has dropped quite a lot since yesterday, i think because i've spent all week in the garage (outside of work and all weekend), racking up a good 30 hours or so and it seems like i have more work to do than i started out with! Lots of holes and rust popping up, lots of rust in awkward places etc. ok, it's by far not as bad as how yours looked when you picked it up, (some pics below) in fact your pics have given me inspiration to get back on the horse, but i also don't have by far the same skills as you do. I can do filler type work but metal work is not really my thing.

I was practicing some welding earlier with an electric and mig welder, found i got on better with the mig and think i will be able to do passable results with some post grinding to smooth it out. I do want to do it properly and cut out the rust holes where needed and replace with some sheet metal i picked up, i will have to learn how to shape this stuff! luckily though these welds will be on the inside and the window runs so they don't have to be perfect, but i'm OCD when it comes to anything i work on, hence baremetalling the interior! But back to the point, just going to sand down exterior to then paint on what was there before :) It actually hurts to think about baremetalling it. I think i set my expectations too high when i started out. Picked up the car at the end of Feb, expecting it to be ready by this weekend (the plan was only to redo the interior in terms of carpets, seats, dash etc, this thanks to OCD turned into what it is now!). When i started to see the rust and decide to work on it i put together a project plan to have it finished by my Birthday (20th April) but i see this slipping and i think that's what's getting me down. It's my first Yank and first v8 and i've only driven it once :(

I've actually had dreams now about driving it, i even had one last night that i just painted it in orange, and it looked good lol. I do have the time, i could take my sweet time and have it ready whenever but it just pains me to see it in pieces for so long, when in a way, i could be driving it as there's nothing too wrong with it. I've wanted a v8 yank for 10 years, saved up lots as we all have etc but instead i still ride around in my Clio. It does have an induction kit, pointless yes, but at least there is some engine sound to it till the v8's running :) So i'm trying to do as much as i can all the time on it, but progress is slow. I cannot wait to get it into epoxy. I'm really gonna push to have it in primer by the end of the long weekend next weekend (silly me, but i'm a very ambitious person). I'm expecting half a week on final rust removal and baremetalling, then the second half of the week (into half the weekend) to have the repairs done. This probably won't include the engine bay stuff that needs work, but would be great if it did! So i hope i wake up tomorrow in a better mood :)

On the note of paint, when i spoke to the paint suppliers, they said i wouldn't need to seal the paint that's already on there. They reckon as its been about 3 years since it was repainted there shouldnt be any solvents left over. They were pretty adement so i wonder what your thoughts are? The good news is though the paint has come in well under budget and i'll be keeping the DeVilleBliss gun, forgot to find out which model it is!! The plan for paint is epoxy interior due to bare metal, sand down exterior, 2k prime exterior ( i was told i dont need to add primer to epoxy, that doesnt match up with my research?), then base colour (keeping red colour) the interior and exterior, only 1 coat on the interior. all, somehow, by the 20th April lol

@ Mark - Yes they are very nice and about same price as a set of autometers but i think i will miss the physical movements of the gauges so i think im going with a a set of Autometers too. Am in touch with RealSteel to get prices, do we qualify as club members for a discount scheme with these guys would anyone know? I looked at that website but they appear to only go up to a '73 but i will shoot them a mail just in case. Think i have the seats sorted, as you mentioned, recovering will be best option. Just need to find someone local. I found a place in the states that do replacement foam for them for $99 i think, the foam on them at the moment is as useful as using an empty cardboard box as an axle stand. As for the stripe, i agree. It does add something to the car, something good that is, but i did at one point think, hmm, i wonder how many jokes will get made that a road line painter drove over it. I'm gonna go with 2 stripes, not sure on white or black. I've used my amazing photoshop skills :) below to get a rough idea of white or black. I'm planning on vinyl, so technically it doesnt really matter cos they could be changed at any time :) As for the air, i'm gona stick with what's in there as it was only replaced a couple of years ago, i'm gonna see how it drives this year and maybe go adjustables at the end of the year.

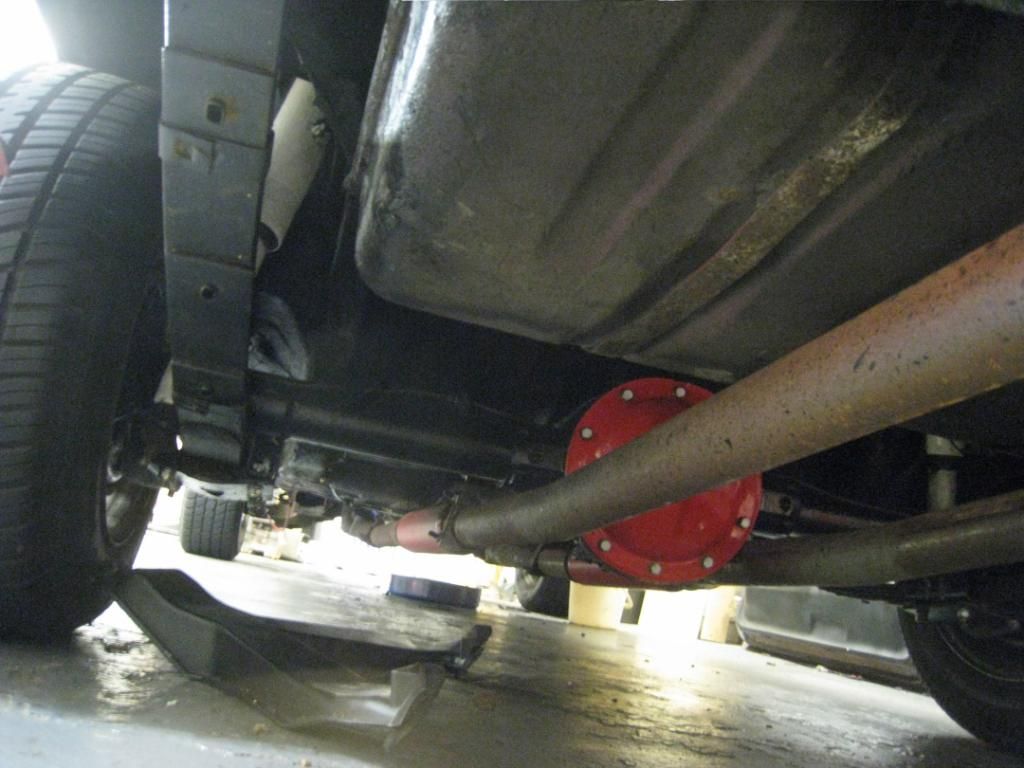
Well, that essay is done, now some pics as rewards for all the reading :)

Cheers

Image

Image

Image

Image

Image

Image

Image

Image

_________________
How to post pics: When writing a message, scroll down and use the "attach file" option. Where possible, a photo sharing service can be used such as Flickr, Imgur etc. The image location (usually ending in .jpg) can be copy and pasted between the ][ brackets that appear when you click the 'Img' button (you can find this button at the top of the message box).

How to post youtube vids: Click on the 'youtubeHD' button at the top of the message box and in the middle of the ][ brackets that just appeared, copy and paste everything from the youtube web address that appears after the = sign i.e if this is the url: https://www.youtube.com/watch?v=K2cNqaPSHv0 just copy "K2cNqaPSHv0").


Top
   
PostPosted:Mon Mar 29, 2010 10:42 am 
Offline
Big Block
User avatar

Joined:Mon Feb 09, 2009 12:41 pm
Posts:2451
That's looking good, you've done a great job of bare metalling that interior. Looks like you've got a good understanding of what needs to be done now, just plan a sequence of events before doing things so's you don't end up having to do anything twice :lol: .

Your paint factors are idiots :lolno: the paint might well have had all the solvents evaporate as they say, but that's not why it should be sealed with an isolator sealer. If you were lucky enough to be able to rub down the paintwork & not break through into the paint job beneath, then yes, you could get away with just painting over the top of what's there. However, the likelyhood is that you will break through to the colour underneath, especially so if you carry out any repairs to the bodywork it's guaranteed to happen. At this point the paintwork will look like the rings on a tree when its been felled. You will be able to see "rings" showing the previous colours/primers applied.

It's when you break through the outer surface that you need to seal the paintwork before applying any primer or paint. If you don't apply a sealer, & you paint directly over the repair, the possibility is that you will have what's known as "shrinkage" appear. This is where you will see the outline of the repair through the surface finish as the solvents in the new paint "eat" into the various substrates below. I always use a product called Barcoat, which is alcohol based & as such won't eat into the substrates, but creates a barrier to allow fresh paint to be applied.

Silverback (Darren) is also a painter on here & he uses the same method & product see link here:-

http://www.classiccamaroclubuk.com/phpB ... f=1&t=1060

So, I'd seal it as a matter of course, rather than run the risk of having any problems in the future. Flat the paintwork off with something like 320 or 400 grit wet & dry. Any finer & you might have adhesion problems. Seal with barcoat but only apply one coat, it comes ready mixed, but make sure the paintwork underneath is fully covered & then apply your primer directly over the top. Do NOT flat down the barcoat, but apply your primer as soon as possible once the Barcoat is dry. Then continue priming/painting as per normal.


Hope that helps, it does get easier honestly, cheers....Nige

_________________
Too much power...not enough hands!!


Top
   
PostPosted:Wed Mar 31, 2010 3:17 pm 
Offline
Big Block
User avatar

Joined:Tue Feb 23, 2010 12:40 pm
Posts:3245
Car Details:'79 Camaro, 350 V8
Location:South Bucks
Thanks Nige,

Great advice and knowledge as always :)
Looks like this week and long weekend will be treating the remaining rust on the body, half the boot is shiny metal bare metal now, should have it 100% by thursday eve (work do tonight). Then got some Builthamber deoxgel for the remainder of the interior, then onto wheel arches etc,a few bits of welding to patch up holes and then ready for paint prep :)

I knew something was wrong when they said about not needing to seal the paint, so thanks for confirming!! I'll source some of the barcoat stuff and hopefully be using it in the next 2 weeks :)

Just searching for some place to recover the seats in the meantime, things starting to look good again :) :)

Cheers,
Ray

_________________
How to post pics: When writing a message, scroll down and use the "attach file" option. Where possible, a photo sharing service can be used such as Flickr, Imgur etc. The image location (usually ending in .jpg) can be copy and pasted between the ][ brackets that appear when you click the 'Img' button (you can find this button at the top of the message box).

How to post youtube vids: Click on the 'youtubeHD' button at the top of the message box and in the middle of the ][ brackets that just appeared, copy and paste everything from the youtube web address that appears after the = sign i.e if this is the url: https://www.youtube.com/watch?v=K2cNqaPSHv0 just copy "K2cNqaPSHv0").


Top
   
PostPosted:Fri Apr 02, 2010 2:03 pm 
Offline
Small Block

Joined:Tue Dec 22, 2009 8:41 pm
Posts:15
Car Details:1978 camaro z28- undergoing full restoration and custom work , impreza wrx, mach1 motorsport, hayabusa, k6 gixxer 1000 and a vectra cdti daily hack
Location:west midlands
Hi, in the middle of restoring my 78 Z28 with a twist and opted for funky gauges also, i obtained a billet facia from the states and have fitted Drift Iridium Gauges into it, no pics of it fitted at moment as car is in workshop bare metaled all over ready for fresh paint job, here is a youtube link for the gauges for an idea,
http://www.youtube.com/watch?v=UzbzybK04Qk
I'll be honest i had a set of Dakota gauges in my 2.9 Cossie powered Fugitive 4 a couple of years ago and these Drift gauges are better in my opinion, Linden.
P.S. chose a colour for your repaint that you will enjoy for a long time, made the mistake of thinking simply on a basic colour and always an idea to think outside the box as they say, mine is being painted BMW Ruby Black Metallic with twin BMW sparkle Graphite metallic stripes, will drop pics on here when completed, approx 2 weeks time. 8-)


Top
   
Display posts from previous: Sort by 
Post new topic Reply to topic  [456 posts ]  Go to pagePrevious1234546Next

All times are UTC


Who is online

Users browsing this forum: No registered users and 47 guests


You cannot post new topics in this forum
You cannot reply to topics in this forum
You cannot edit your posts in this forum
You cannot delete your posts in this forum
You cannot post attachments in this forum

Search for:
Jump to:  
cron
Powered by phpBB® Forum Software © phpBB Limited