The Camaro Club (UK)

Online Community for all Camaro Owners and enthusiasts
It is currently Fri Nov 01, 2024 6:29 am

All times are UTC


Post new topic Reply to topic  [57 posts ]  Go to pagePrevious123456Next
Author Message
PostPosted:Thu Jun 08, 2017 6:29 am 
Offline
Big Block
User avatar

Joined:Sun Jan 13, 2013 7:00 am
Posts:1158
Car Details:1986 Camaro, bought into Spain by me in 1993.
305 replaced by a 355, 750 Demon carb, RPM AirGap intake, Brodix heads, Hedman Hedders, 3" Flowmaster exhaust.
Wheels are Summit aluminium 5 spokes, tyres are 245 rear 225 front BF Goodrich.
B/M transmission, battery relocated to the rear, GoodMark 4" cowl steel hood.
Location:Spain East Coast
I admire your attention to detail, excellent work. :clap:


Top
   

Re: Jamieg285's '79 rebuild

Sponsor

Sponsor
 

PostPosted:Thu Jun 08, 2017 1:27 pm 
Offline
Big Block
User avatar

Joined:Fri Mar 19, 2010 1:35 am
Posts:2566
Car Details:79' camaro road & track day toy. 383 stroker, 5 speed TKO trans, lots of suspension stuff, 13" Vette brakes, 18" wheels.
Location:Luton
good to see more new metal being added !

_________________
“You only live once, but if you do it right, once is enough.”


Top
   
PostPosted:Fri Jun 09, 2017 2:42 pm 
Offline
Big Block
User avatar

Joined:Tue Feb 23, 2010 12:40 pm
Posts:3245
Car Details:'79 Camaro, 350 V8
Location:South Bucks
Great job! Starting to move towards the outside of the car now :thumbup:

_________________
How to post pics: When writing a message, scroll down and use the "attach file" option. Where possible, a photo sharing service can be used such as Flickr, Imgur etc. The image location (usually ending in .jpg) can be copy and pasted between the ][ brackets that appear when you click the 'Img' button (you can find this button at the top of the message box).

How to post youtube vids: Click on the 'youtubeHD' button at the top of the message box and in the middle of the ][ brackets that just appeared, copy and paste everything from the youtube web address that appears after the = sign i.e if this is the url: https://www.youtube.com/watch?v=K2cNqaPSHv0 just copy "K2cNqaPSHv0").


Top
   
PostPosted:Thu Sep 07, 2017 2:45 pm 
Offline
Big Block

Joined:Mon Mar 09, 2009 12:13 pm
Posts:205
Car Details:1979 Camaro
I've been a bit too slack with my updates. Although not much was done, I was expecting to complete certain jobs and post an update to cover all of it, but for various reasons I've not had the time to work on the car - in fact I've not been able to get to it for nearly 6 weeks now - which is really annoying as the weather has been ideal for it. Anyway, using the photos for reminding, here's what I managed to get done in June and July.

As mentioned at the end of the previous post, I was in the process of patching up the rear crossrail. Here you can see the first part of the patch roughly welded in and before cleaning up.
Image

It looks an odd shape, but that is because it will match up to the patch parts I started a couple of years ago. It will make more sense when you see them together.
Here is said piece, which has been cleaned up and had a layer of epoxy primer applied to the inner face. The other side will be accessible when it's on the car, so I will clean/paint that later.
Image

This was trial fitted and marked where it needed triming or primer removed in the welding areas.
Image

I then drilled all the holes ready for spot welding and whilst the drill was out I did the same on the other side.
Image

I'd (relatively) recently cleaned up and epoxy primered the end of the frame rails. The patch was offered up and I marked all the areas that would be welded, then proceeded to grind the epoxy of these spots.
Image


And here you can see the patch welded into place. It still needs cleaning up and epoxying, which is one of the next jobs on the list. Just ahead of that, I plan to chop out more of the lower edge of the tail panel. I'm going to cut it along the line of spot welds where it joings the trunk pan, as this will give me something to support the new panel, rather than it being a straight butt weld.

Image


Lets hope the next update isn't as long coming as this one was!


Top
   
PostPosted:Tue Feb 13, 2018 1:33 pm 
Offline
Big Block

Joined:Mon Mar 09, 2009 12:13 pm
Posts:205
Car Details:1979 Camaro
How time flies when you're not working on the car!

I did manage to get a little bit more done at the end of last season. I ground back the welds on the patch panel and cut back some more of the outer panel on the passenger side, cleaned up the metal that side and then applied some epoxy primer to give it all some protection over the winter.
Image

Not much happened for the next few months as the weather wasn't kind and it was usually too wet to do much. When the parts cars became available I was able to take a clean pair of z28 fenders, including the lower extensions and I was also able to cut the entire 6 inches off the back end - giving me the elusive trunk lip and the tail panel to quarter filler pieces. (see below) and a full tail spoiler set. To finish off, there was also a nice looking set of tail lights, which turned out to be OER reproductions. I ran out of time and budget to get any more bits, but may see if I can get back there sometime.

With some recent dry weather I've had the time to start separating the bits of panel that I wanted to keep from those that I didn't. It took a few hours of careful cutting and chiselling, but eventually I ended up with just the trunk lip and filler panels.
Image

Image

Image


The fillers clearly aren't perfect, but the worst bits are also the easiest bits to repair.

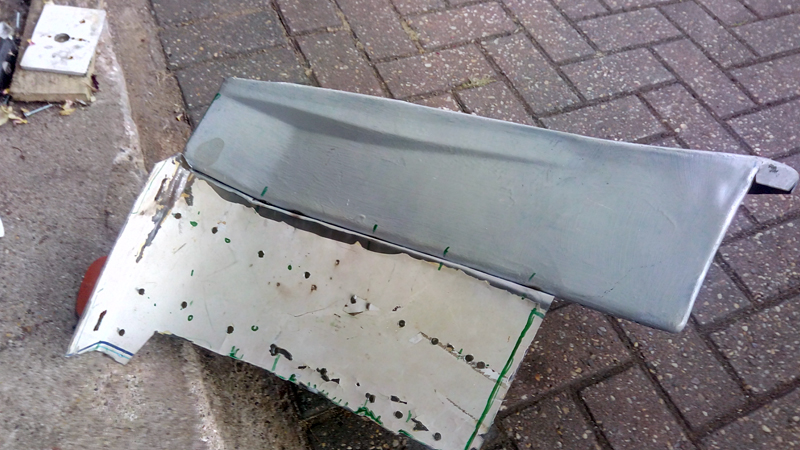
In case you can't work out what these are, the brown center piece sits on top of the tail panel to make the channel the trunk seal fits into (see the top of the first pic in this post). The fillers go between the tail panel and the quarters:

Image

Image

This now changes the plan for the tail panel. I'll now be removing the full tail panel and replacing with the new one with these bits cleaned up and attached to it. The fun part will be getting the old filler pieces separated from the quarter panels. As my replacement quarters are patches and not full panels they don't reach all the way around the end. I may have to retain the rear most parts of the quarters where they join the fillers, or I may have to fabricate something to join the two new parts together. I need to have a good look at it to work out how to tackle it.

My enthusiasm is firing again, so I'm now hoping for some good weather so I can get stuck in again.


Top
   
PostPosted:Wed Mar 21, 2018 12:56 pm 
Offline
Big Block

Joined:Mon Mar 09, 2009 12:13 pm
Posts:205
Car Details:1979 Camaro
Time for another mini-update.

I've been pressing on with the tail panel. Inspection of the removed filler panel showed it was in pretty good condition and only needed a couple of patches.
This will be hidden behind the tail light/inside the trunk, so didn't need to be too pretty.
Image

Image

Image


With that done, I was able to start a loose fit to the tail panel. There's quite a bit of wiggle room on these bits, so I'm only going to screw it together for now and wait till I'm happy with the fit will all the other bits on the car before committing to welding it.
Image

Image
Image

The filler panel does still need a fair bit of cleaning up, but I'll wait till later to do that. I want to get a few things ready for epoxy primer and do them all at once.

For now, the filler/tail combo is ready for trial fitting.

Image


With that done, I've started drilling out the spot welds to get the tail panel out. I thought I'd got some pictures of progress with that, but they're not on the camera, so they'll have to wait till next time.

It looks like getting the tail panel may be tricky. The main spot welds where it meets the trunk pan don't look too bad, but the areas where it links to the quarters are going to need some careful cutting.

Hopefully it won't be too long before the next update.


Top
   
PostPosted:Wed May 23, 2018 1:49 pm 
Offline
Big Block

Joined:Mon Mar 09, 2009 12:13 pm
Posts:205
Car Details:1979 Camaro
So much for not leaving much time before the next update! I have been able to spend a bit of time on it, but progress has been slow so it didn't seem worth posting any updates. Given that it's more than 2 months on, I figured I best put something up, just to show I'm still here.

So, with the tail panel and filler panels ready to fit, it was back to the car to get on with removing the old ones. Spot weld cutting went quite well, just needed to remember to take things steady and not rush.
Image

Getting in under here was tricky, especially as I'm trying to keep the quarter panel bits intact. Some of it was rusted apart, some drilled out OK. I am stuck on the lowest bit as I can't get the drill in at the right angle. I think I'm going to cut around this bit and cut it out when there's more room.
Image

Passenger side turned out easier, the bottom section just popped apart with a little persuasion and is ready to come out.
Image
Image

As I get closer to getting the panel out, I've been thinking it through and realise I need to have a panel in place so that I can close the trunk. I should be able to screw the new one in place to hold it, but in it's current state it wouldn't be protected from the elements. Therefore, work returned to the garage where I sanded down the panel and applied a couple of layers of epoxy primer.
Image
Image

With that done, it was back to the car again, now looking to seperate the filler panel from the quarter. There's been some repair work here, so not sure how tricky this will be.
Image

The patch separated quite easily (you can see why!)
Image

Separating the trunk gutter piece was tricky, having to drill out the welds in the channel, but it did eventually come out without too much damage done.
Image

After sanding back the paint/filler on the other side, the picture was similar, but looked a better job.
Image

Thankfully there were less spot welds on the gutter this side, so it was easier to get out. Not sure if it's part of a patch or the original quarter metal, bit it's still welded to the filler panel underneath (which had completely rusted out on the drivers side!), so there's still a little bit spot weld cutting to go, but I'm not far from freeing it off and being able to remove the panel.
Image

The weather's been good to me over the recent weeks, so I hope it continues and the next update will be sooner and show a new tail panel in place.

I need to work out what the next area of focus will be - I'm currently thinking driver drop off and trunk floor repairs.


Top
   
PostPosted:Wed Jun 06, 2018 1:46 pm 
Offline
Big Block

Joined:Mon Mar 09, 2009 12:13 pm
Posts:205
Car Details:1979 Camaro
Having mentioned the good weather, it was inevitable that it would turn instantly and stop me working for the next few available days. I did eventually managed to match some free time and some dry weather and was able to hit the next big target - the tail panel is out.
Image

It too a little more wiggling that expected and there was a spot I missed in both corners, but it did eventually fall out.

I had to cut the drivers edge as I couldn't get to all the spot welds with the panel being in the way. When it was out I was able to finish the job off. The edge of the quarter panel isn't pretty, but some of this will be replaced by the new panel. I am expecting to have to add some extra metal in some places here.
Image

Next target it to get the new panel in place, albeit only screwed in place for now. I cleaned up the exposed trunk edge and the inner face of the other side of the cross rail patch and applied some epoxy.
Image
Image

I had a quick go at lining up the tail panel and it looks like it's going to be tricky to get it all lined up, especially when I put the upper extension panel on it. I found that my cross rail panel was too far back and interfering with the fit. I can bend this back easily enough, so we'll see how that goes.

Next job is to weld the cross rail panel up, and sort out the center section where the 2 patches join.


Top
   
PostPosted:Mon Jul 30, 2018 1:52 pm 
Offline
Big Block

Joined:Mon Mar 09, 2009 12:13 pm
Posts:205
Car Details:1979 Camaro
Time for a long overdue update. I've been plugging away, bit by bit, but managed to get a good amount of hours in over the weekend, so made some good steps.

The right side of the cross rail has now been welded in, but I forgot to get a picture so I will have to get one at a later stage. Once that was in I was able to start trial fitting the tail panel. I was pleased to find that with the panel was able to squeeze in with the upper filler pieces attached (although only because the lower part of the left quarter panel is loose and can be swung to the left to make room). A little bit of wiggling and clearancing was required, but I did eventually get it into place and was able to start working out where the spot welds would be needed.
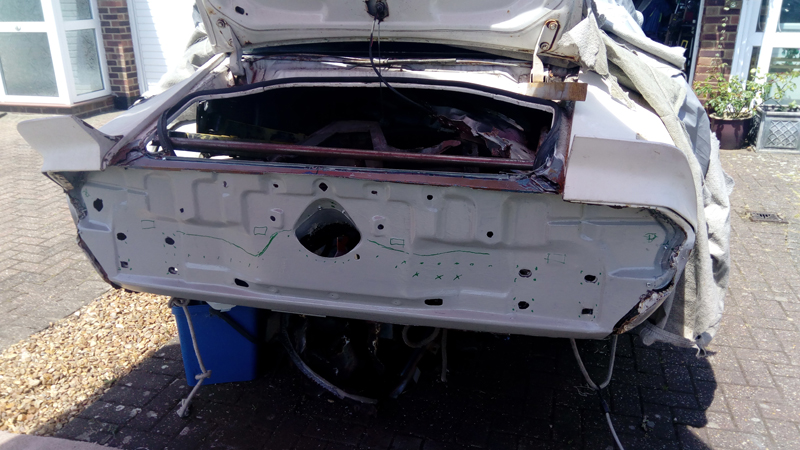
Image

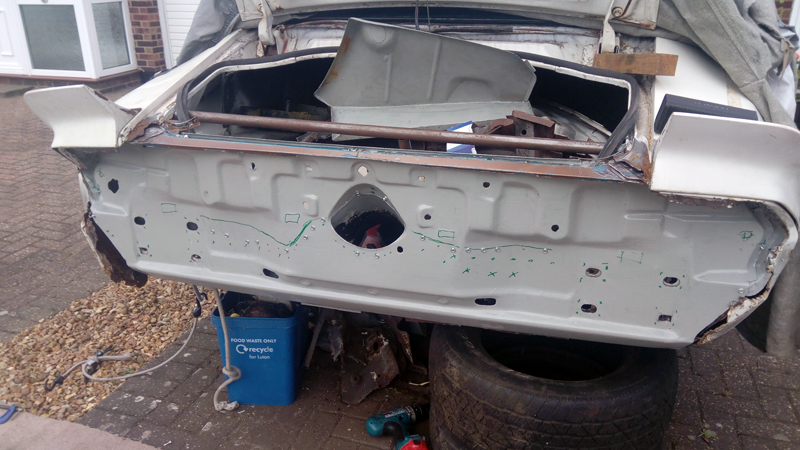
I should have taken some pics from the inside, as the panel didn't conform to the trunk panel as well as I'd hoped and it was clear it would need to be pulled in at a number of places. As this could then affect the fit of the whole panel, I opted to get the screws out and firmly attach the panel and pull it into place. As you can see, some of my estimates on where to drill holes were a bit off!
Image

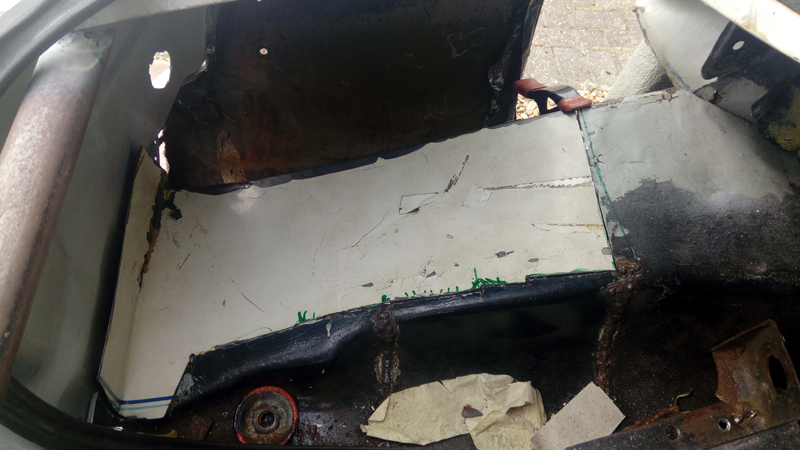
With the tail panel in it's final location, I was able to move back inside the trunk and start working on the patch for the floor. No pics, but I trial fitted the drop off, clamping it to the wheelhouse and a screw to the tail panel, giving me the outer boundary for the patch. I mocked up a cardboard template, then cut and folded a section from the old quarter panel into a rough shape. After lots of fettling, it was an acceptable fit (for now!)
Image

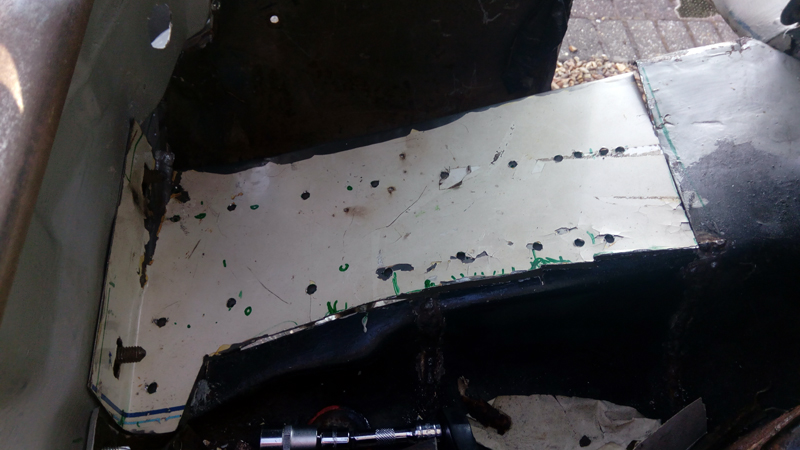
Whilst clamped in place I marked the outline of the frame underneath, and then used this as a template to drill the holes ready for welding.
Image

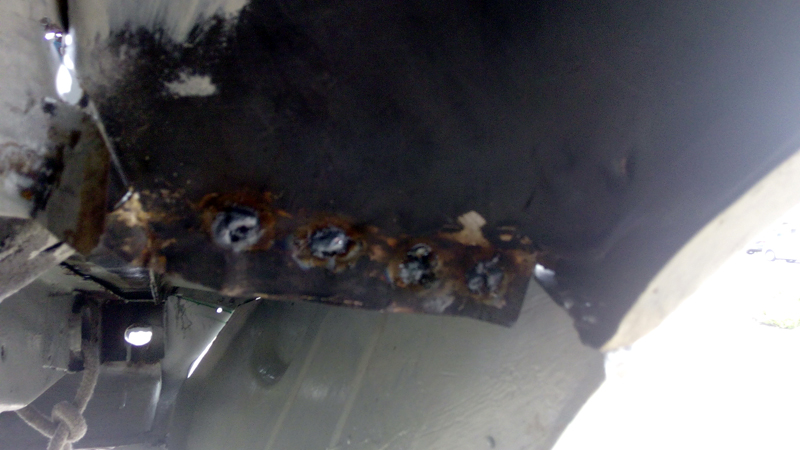
Again, no pics (I'm slipping :( ), but I now had to cut out one of the trunk reinforcement pieces, ready to fit to the patch. Not sure if I bent it whilst removing, whether the patch isn't quite right, or the frame isn't welded in the right place (I hope not!) but I couldn't get the holes to get close to the holes in the tail panel. After about an hour of pulling, pushing, hammering and bending, I gave in and simply cut the ear off and welded it back on 1/2 inch lower down.
Image

With this now fitting I refitted bumber and bolted it up, only to find it pulls the patch quite a bit and it's too short (no pics again, but you'll see it later). I will need to patch a thin strip across the top later on.

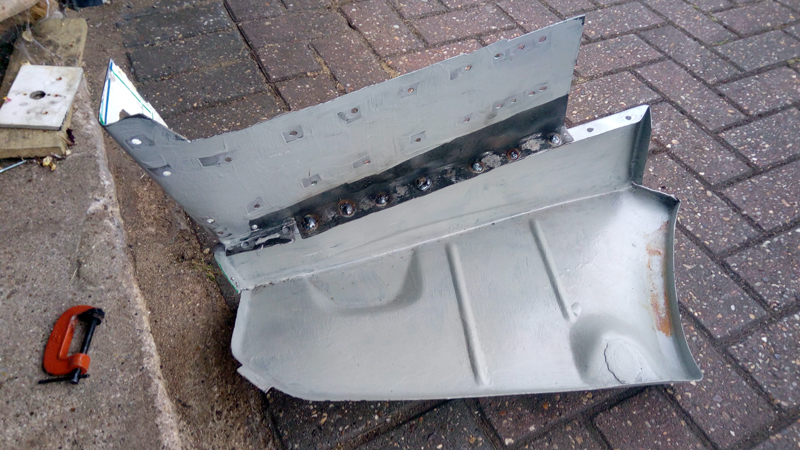
Holes on the patch were then cleaned up, holed added to the side part and the patch was welded to the drop off (far easier than trying to attach the drop off in-situ)
Image

And here's the top side
Image

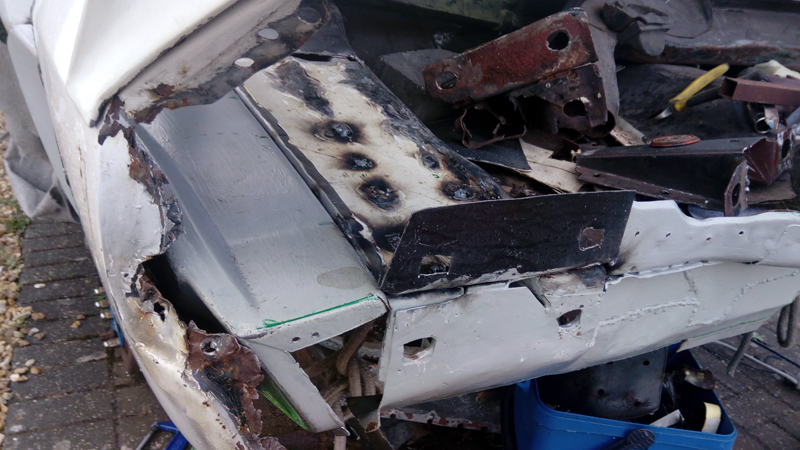
This was carefully clamped into place and a small bit of the trunk patched. The reinforcement piece bolted in to hold everything in place, then I welded into place at the drop off/wheelhouse joint
Image
Image

Then, inside the trunk I welded up the holes that were not hidden by the reinforcement piece and just tacked the edges to hold the patch down when the reinforcement was removed.
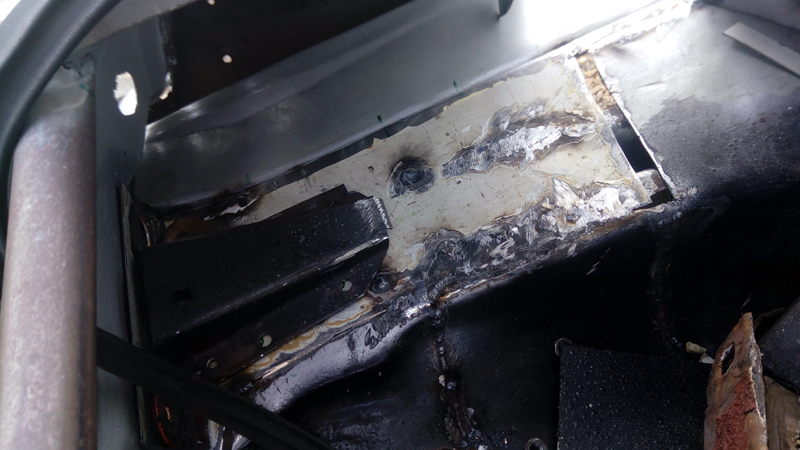
Image

When I removed the reinforcement I discovered I had some poor penetration on some of the welds, due to the thicker metal of the frame. I had to cut out a couple of the welds and re-do them on a higher heat setting. I also unscrewed and removed the tail panel to give me better access to the rear most set of welds.
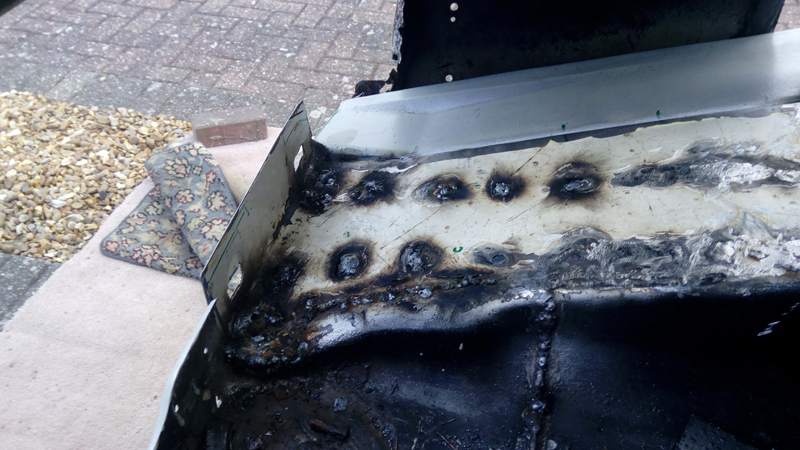
Image
Image

Rain and lack of welding gas put a stop to proceedings at this point. When I get some more gas, the next steps will be to fill the strip at the top of the patch and then I can clean up all the welds and weld in the reinforcement.


Top
   
PostPosted:Sun Dec 30, 2018 10:29 pm 
Offline
Big Block
User avatar

Joined:Tue Feb 23, 2010 12:40 pm
Posts:3245
Car Details:'79 Camaro, 350 V8
Location:South Bucks
You continue to make great progress with all the metal cutting, shaping and welding! It's certainly miles better than when you got hold of it, good job as always. Where is it up to now? Likely to make a debut in 2019?

_________________
How to post pics: When writing a message, scroll down and use the "attach file" option. Where possible, a photo sharing service can be used such as Flickr, Imgur etc. The image location (usually ending in .jpg) can be copy and pasted between the ][ brackets that appear when you click the 'Img' button (you can find this button at the top of the message box).

How to post youtube vids: Click on the 'youtubeHD' button at the top of the message box and in the middle of the ][ brackets that just appeared, copy and paste everything from the youtube web address that appears after the = sign i.e if this is the url: https://www.youtube.com/watch?v=K2cNqaPSHv0 just copy "K2cNqaPSHv0").


Top
   
Display posts from previous: Sort by 
Post new topic Reply to topic  [57 posts ]  Go to pagePrevious123456Next

All times are UTC


Who is online

Users browsing this forum: No registered users and 16 guests


You cannot post new topics in this forum
You cannot reply to topics in this forum
You cannot edit your posts in this forum
You cannot delete your posts in this forum
You cannot post attachments in this forum

Search for:
Jump to:  
cron
Powered by phpBB® Forum Software © phpBB Limited