The Camaro Club (UK)

Online Community for all Camaro Owners and enthusiasts
It is currently Fri Nov 22, 2024 11:24 am

All times are UTC


Post new topic Reply to topic  [57 posts ]  Go to pagePrevious123456Next
Author Message
PostPosted:Sat Sep 24, 2016 10:46 am 
Offline
Big Block
User avatar

Joined:Tue Feb 23, 2010 12:40 pm
Posts:3245
Car Details:'79 Camaro, 350 V8
Location:South Bucks
You've really gotten into the bones there! Great work, always hard to find time but those 30 - 40 minute slots really help keep things moving by chipping away. Keep it going it'll be worth it :thumbup:

_________________
How to post pics: When writing a message, scroll down and use the "attach file" option. Where possible, a photo sharing service can be used such as Flickr, Imgur etc. The image location (usually ending in .jpg) can be copy and pasted between the ][ brackets that appear when you click the 'Img' button (you can find this button at the top of the message box).

How to post youtube vids: Click on the 'youtubeHD' button at the top of the message box and in the middle of the ][ brackets that just appeared, copy and paste everything from the youtube web address that appears after the = sign i.e if this is the url: https://www.youtube.com/watch?v=K2cNqaPSHv0 just copy "K2cNqaPSHv0").


Top
   

Re: Jamieg285's '79 rebuild

Sponsor

Sponsor
 

PostPosted:Tue Nov 15, 2016 1:40 pm 
Offline
Big Block

Joined:Mon Mar 09, 2009 12:13 pm
Posts:205
Car Details:1979 Camaro
Time for another update, just to show I'm still here and working!

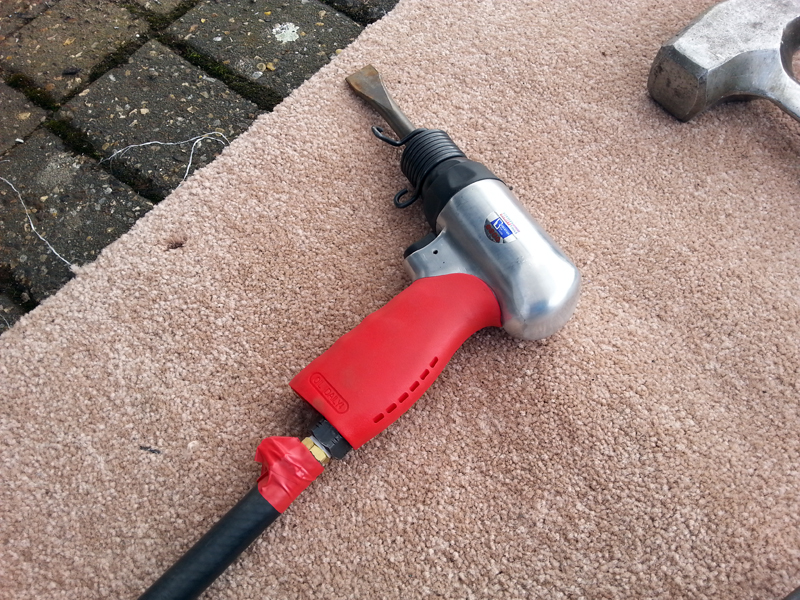
First up was the removal of the rusted section of the inner quarter. This was the first opportunity I'd had to use the air hammer with chisel attachment. (You can also see my nice new carpet, which has a deep pile and is kind on the knees :-) )
Image

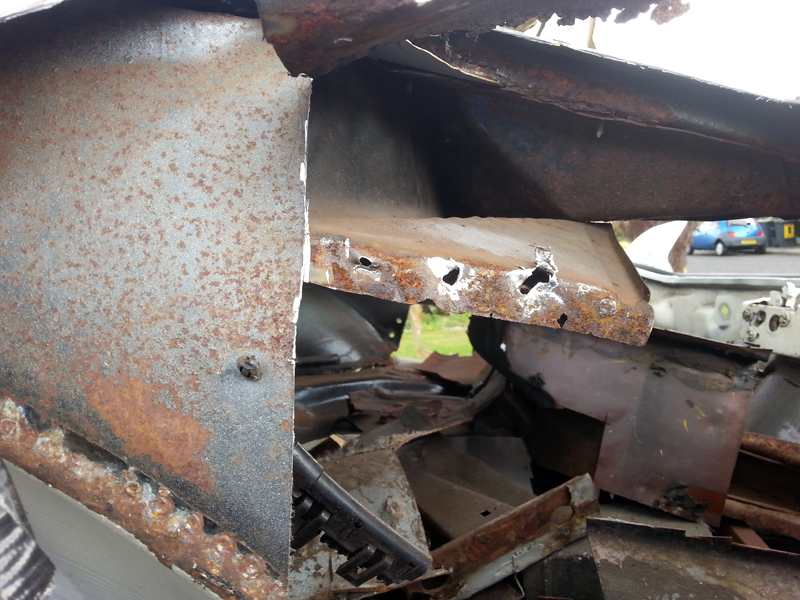
All I can say is wow - I wish I had this when I started, it would have saved me hours of pounding away with a lump hammer. I need to get used to using a bit, as it can be a litte over agressive, but will make a big difference going forward. Anyway, it took just a few seconds to cut away 5 spot welds to the inner support and the piece was out.
Image

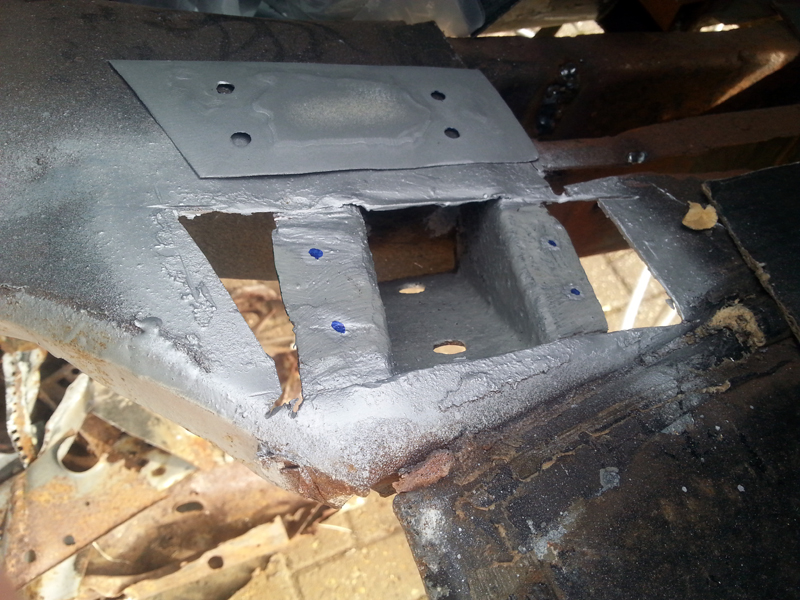
With that piece out of the way, I noted that it gave me good access to re-do the repair done to the trunk floor, many years ago when I was still working out which end of the welder to use. To say it was ugly and poor is an understatement, and needed to be taken out. I didn't get a 'before' picture, but here it is cut and primed ready to go.
Image

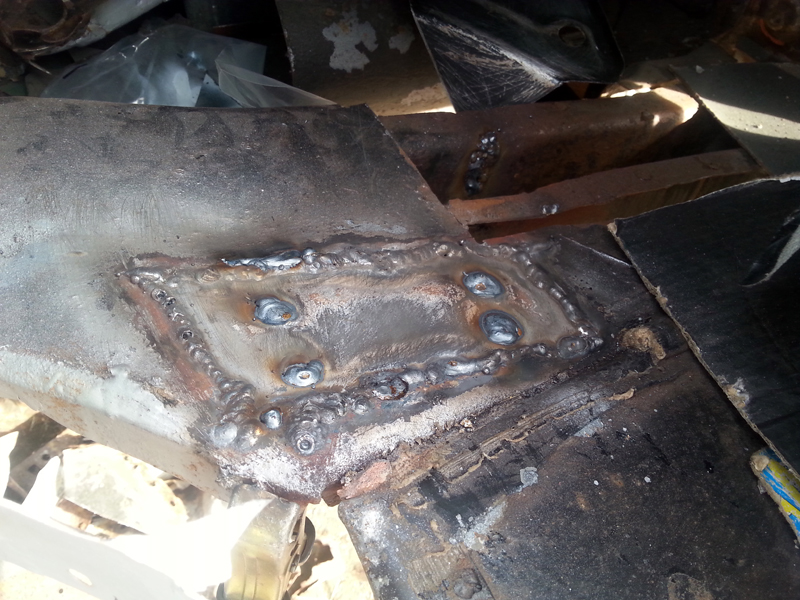
When it was a case of weld it in, clean it up and apply some epoxy.
Image
Image

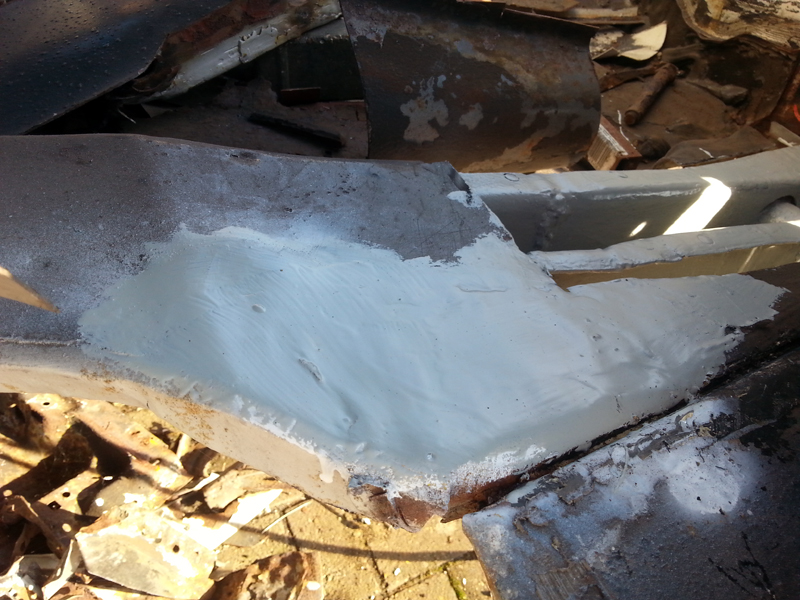
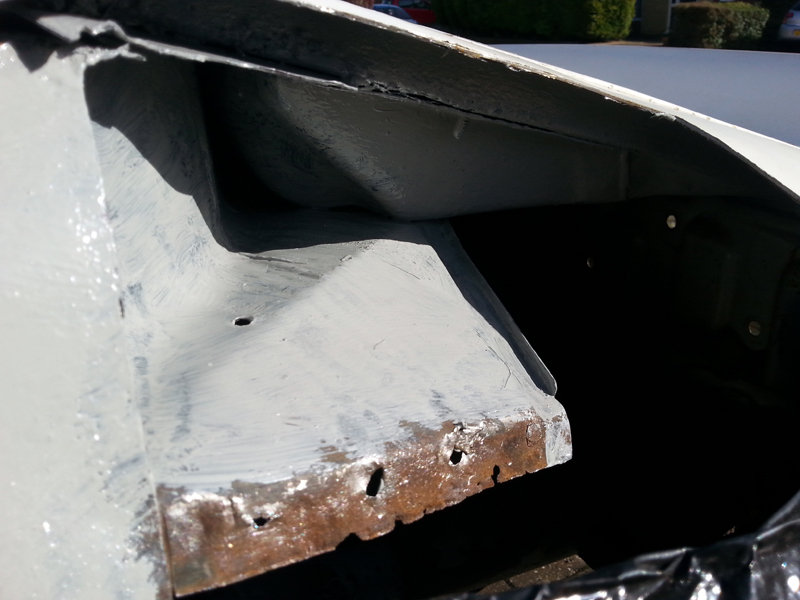
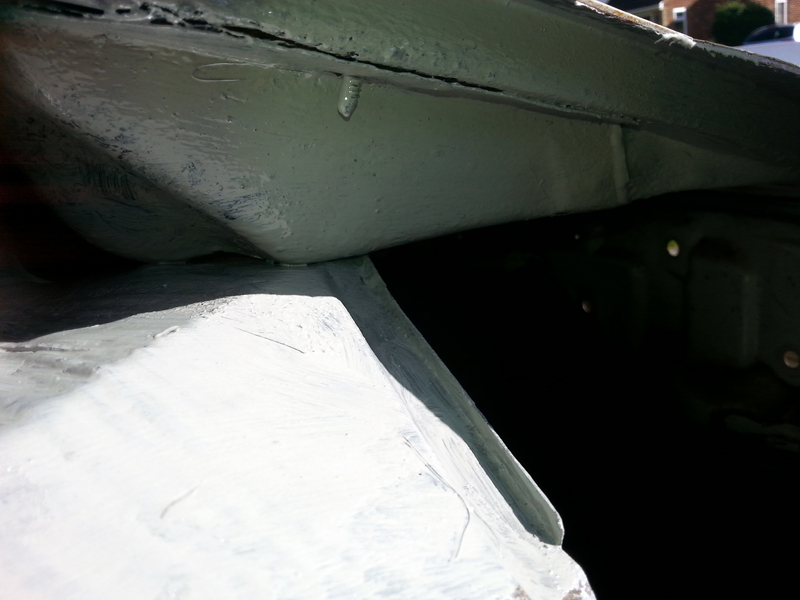
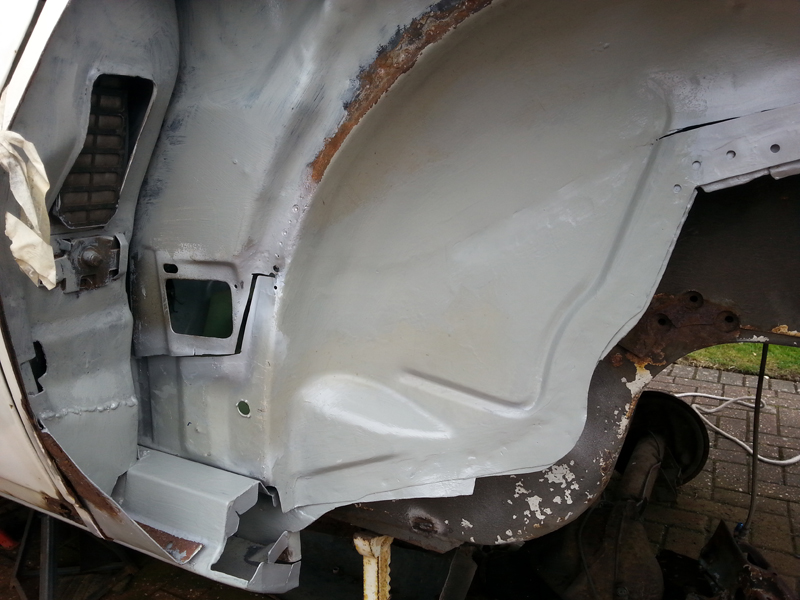
Before applying the epoxy, I took the chance to clean up the last lot of welding (to the inner wheel house) and some of the trunk support and frame rail and make good use of that batch of epoxy.
Image
Image
Image

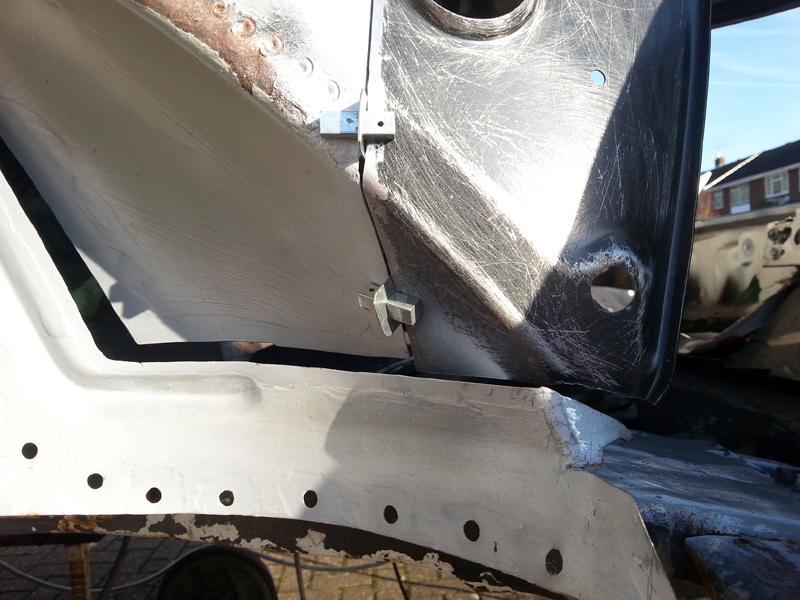
The final part of this installment was the insertion of the new part to replace what was cut out at the top of this post.
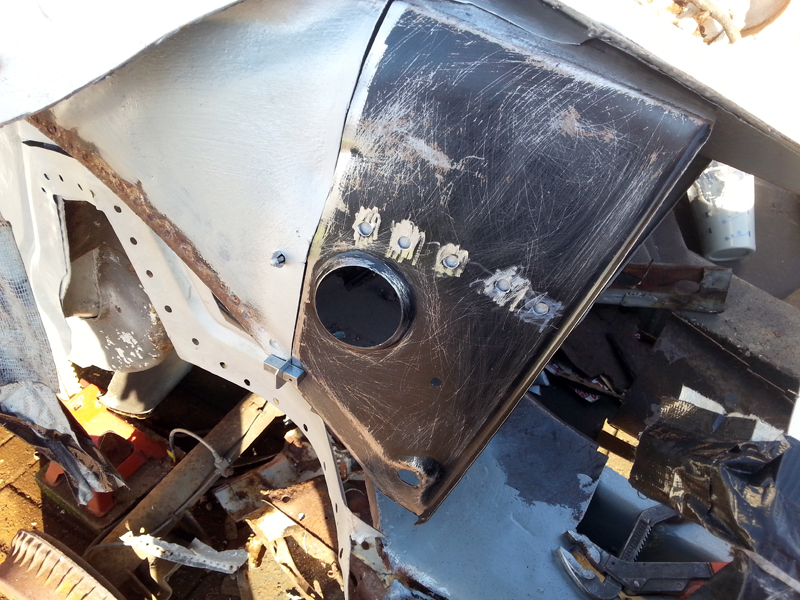
I carefully aligned it at the lower edge, where the arch is, to ensure the contour remained smooth across the pieces. A couple of butt weld clamps held it in place, and once tacked in, I was able to massage the upper parts to get them to line up as I needed.
Image
Image

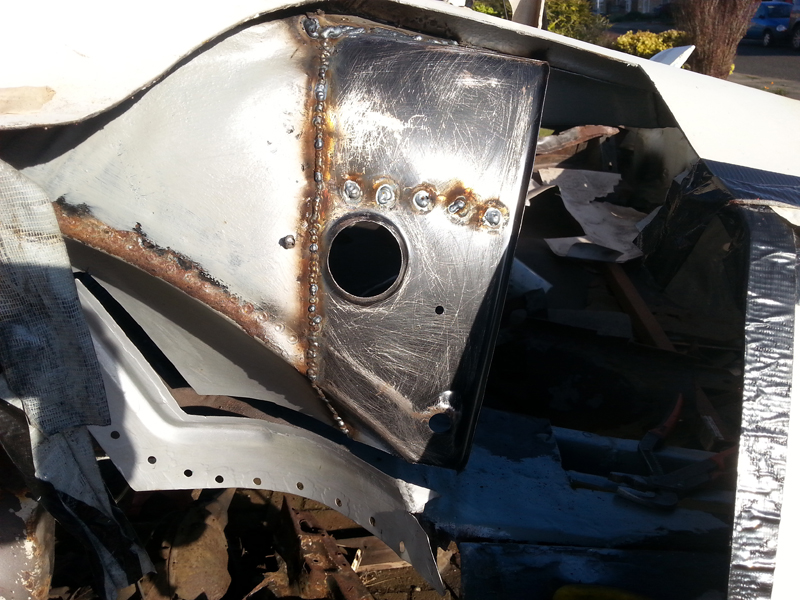
When the seam was done, I was then able to clamp the piece onto the inner support and refill the spot welds.
Image

I've ground down the welds on the lower part of the arch, as these will be visible behind the wheel. The upper parts will be behind the outer wheelhouse, so I'm not going to worry about cleaning those up. There is a section of welding that will be visible from inside the trunk, so I plan to clamber in there sometime to clean it up. I'll need to do that before I apply any epoxy, so for now have just sprayed some cheap paint over it to protect the metal until I'm ready to sand it back of, clean it all up and epoxy both sides.

Before I do that, I plan to fix the trunk floor (where I'd cut some away to allow access to the frame rail) and make it whole again, so that it's secure enough to work inside when working on the arch.

The weather has well and trully turned now, and is a lot colder and frequently wet at the times when I'm available. Work rate will have to slow, but I do want to keep plugging away at it.


Top
   
PostPosted:Tue Nov 15, 2016 8:54 pm 
Offline
Big Block
User avatar

Joined:Sun Jan 13, 2013 7:00 am
Posts:1158
Car Details:1986 Camaro, bought into Spain by me in 1993.
305 replaced by a 355, 750 Demon carb, RPM AirGap intake, Brodix heads, Hedman Hedders, 3" Flowmaster exhaust.
Wheels are Summit aluminium 5 spokes, tyres are 245 rear 225 front BF Goodrich.
B/M transmission, battery relocated to the rear, GoodMark 4" cowl steel hood.
Location:Spain East Coast
You're doing a great job.....keep plugging away...... :thumbup:


Top
   
PostPosted:Thu Nov 17, 2016 8:09 am 
Offline
Big Block
User avatar

Joined:Fri Mar 19, 2010 1:35 am
Posts:2566
Car Details:79' camaro road & track day toy. 383 stroker, 5 speed TKO trans, lots of suspension stuff, 13" Vette brakes, 18" wheels.
Location:Luton
More good work.. I'm often surprised how much complex metal there is tin the rear arches of these cars.

_________________
“You only live once, but if you do it right, once is enough.”


Top
   
PostPosted:Sat Nov 19, 2016 5:54 pm 
Offline
Big Block
User avatar

Joined:Tue Feb 23, 2010 12:40 pm
Posts:3245
Car Details:'79 Camaro, 350 V8
Location:South Bucks
Quote:
I'm often surprised how much complex metal there is tin the rear arches of these cars.
Same, it can get intense watching these types of rebuilds, there are so many metal bits and structures hidden away that you wouldn't otherwise have known about. It's like watching a maze. +1 for the good job!

_________________
How to post pics: When writing a message, scroll down and use the "attach file" option. Where possible, a photo sharing service can be used such as Flickr, Imgur etc. The image location (usually ending in .jpg) can be copy and pasted between the ][ brackets that appear when you click the 'Img' button (you can find this button at the top of the message box).

How to post youtube vids: Click on the 'youtubeHD' button at the top of the message box and in the middle of the ][ brackets that just appeared, copy and paste everything from the youtube web address that appears after the = sign i.e if this is the url: https://www.youtube.com/watch?v=K2cNqaPSHv0 just copy "K2cNqaPSHv0").


Top
   
PostPosted:Thu Mar 16, 2017 1:12 pm 
Offline
Big Block

Joined:Mon Mar 09, 2009 12:13 pm
Posts:205
Car Details:1979 Camaro
Having spent the 2016/17 winter playing with manual tyre changing tools I got for Christmas, I've finally started back on the Camaro for the first time this year.

Yesterday lunchtime was spent removing the driver's trunk drop off. Armed with the air hammer (my new favourite tool), I was able to rip through the seams quite quickly. There were a few rips to the trunk lip, but that wasn't too bad as it was clear that there was some excessive rust along here too, so I will be looking to patch most if not all of it.

This may make the job of welding the new drop off in a bit easier, as I'm now looking at the possibility of welding the trunk pan patch the drop-off before it's welded into the car, then tying it onto the frame rail and the surviving trunk edge. Time will tell if that works as well as I imagine.

Sorry for the lack of pictures, I ran out of time, but will snap a couple when I get back to work next time.

I tried to mock fit the drop off, and it looks like there will be some massaging required with the outer wheelhouse, which hasn't been welded in yet.


Top
   
PostPosted:Wed Mar 29, 2017 11:47 am 
Offline
Big Block
User avatar

Joined:Tue Feb 23, 2010 12:40 pm
Posts:3245
Car Details:'79 Camaro, 350 V8
Location:South Bucks
How did you get on with the tyre changing machine? Is it easy enough to get the hang off and sturdy enough?

Sounds like the trunk pan will be some fun work! Have you been back since for any pics?

_________________
How to post pics: When writing a message, scroll down and use the "attach file" option. Where possible, a photo sharing service can be used such as Flickr, Imgur etc. The image location (usually ending in .jpg) can be copy and pasted between the ][ brackets that appear when you click the 'Img' button (you can find this button at the top of the message box).

How to post youtube vids: Click on the 'youtubeHD' button at the top of the message box and in the middle of the ][ brackets that just appeared, copy and paste everything from the youtube web address that appears after the = sign i.e if this is the url: https://www.youtube.com/watch?v=K2cNqaPSHv0 just copy "K2cNqaPSHv0").


Top
   
PostPosted:Wed Mar 29, 2017 5:14 pm 
Offline
Big Block

Joined:Mon Mar 09, 2009 12:13 pm
Posts:205
Car Details:1979 Camaro
Quote:
How did you get on with the tyre changing machine? Is it easy enough to get the hang off and sturdy enough?
Still a work in progress. I knew when I bought it that I'd need to do some improvement works needed. I've welded up the base to make it stronger, sunk massive rawl bolts into the garage floor to hold it steady, added bracing to strengthen the bead breaker and added some wooden blocks to the motorbike attachment to protect the alloy rim. So far so good, I have managed to change my rear m/c tyre within an hour. I need to rething the wooden blocks, as they didn't provide a decent grip. I'm going to add some profile to them, and add some rubber tube to add grip.

The biggest problem was the height. On it's own, the basic changer is fine, but the m/c adapter adds almost a foot to the height, putting the wheel up quite high. I ran into clearance problems with it, where the long removal bar didn't have enough room to swing up without hitting the garage door. I was able to work around that, but have now moved on to a new solution. I've cut the main post into three parts, and bought a tube the same size (almost!) to slip inside it. This way, when I use the m/c I can take out the middle section, lowering the whole assembly, and put it back again when doing car ones.

Quote:
Sounds like the trunk pan will be some fun work! Have you been back since for any pics?
It's been hard to find time to get back out in the last couple of weeks, and impossible at the weekends. Maybe next week...


Top
   
PostPosted:Fri Apr 07, 2017 2:09 pm 
Offline
Big Block

Joined:Mon Mar 09, 2009 12:13 pm
Posts:205
Car Details:1979 Camaro
Pictures Update....

I (almost) finished off welding in the rear most part of the inner wheel house. Here you can see I've welded it up along the seam and the spot welds on the edge. I've started grinding back the seam, but there's a thin spot where I've gone through and need to re-do. I sprayed on some basic primer to give it a bit of protection over the winter, and will strip it back before putting the epoxy primer on.
Image

Here's the void left just after the trunk drop off has been chopped out. It doesn't really show the rough edge very well, but I'm currently planning to make a patch that will fit the whole area between the green lines.
Image


As for the tyre changer, I've just completed the next set of modifications and am ready to change the next tyre. In this first pic, it's assembled as standard with the motorcyle adapter on top. I've perched the supplied tyre lever on top to show the clearance problem I have, before you even put a wheel on that will add 6-10 inches in height. (Shameful garage blurred out to help you see what bits are the tyre changer ;) )
Image

How to you make something shorter? You cut bits out of course. The problem with this plan is the changer has multi functions. If you cut the bottom off for doing motorbike tyres, it will be too short for car tyres without the adapter. Also, the pillar has a bracket that is used by the bead breaker, and this needs to be at the right height to get the pushing angle right. The solution was to cut and make the center section removeable and re-fittable (is that a word?).

I measured up, then made 2 cuts:
Image

I then measured the inner diameter and ordered another piece of tube to match. In the end the one that came was a bit too big, and didn't fit, so I had to slice it length ways and squeeze it together to make it fit. These sleeves were fitted to the bottom of the top and middle sections and welded in to secure them. Each was then slotted into the section below and a hole drilled to accept a bolt that would hold it in place when in use. Nuts were welded to the inner side of the sleeves.
Image

Here you can see it re-assembed with the middle section removed. It sits to the left and shows the inner sleeve out the bottom. I deliberately made the sleeves quite long, in order to maintain structural strength. Quite a bit of effort needs to be applied when breaking beads and getting the tyre on the rim and I didn't want it flopping around.
Image


Top
   
PostPosted:Wed Apr 26, 2017 1:34 pm 
Offline
Big Block

Joined:Mon Mar 09, 2009 12:13 pm
Posts:205
Car Details:1979 Camaro
With everyone seeming to be getting their projects roadworthy, it looks like it's up to me to keep the candle burning :wave:


Work in 2017 is struggling to get started properly. It's taken a while for the weather to come good, then when it has I've not had the time available. I have however managed short session where I've been able to make a start on the trunk floor.

As previously described, I removed a chunk of the floor directy above the drivers frame rail, and cut/pulled back the section next to it to give me room to do the frame rail repair. Therefore, my first steps are to put that back as it was.

First job was to clear some of the junk and dirt from the area, and then clean up the edges ready for welding.
Image

It's then carefully bent back down and clamped in place.
Image

Then welded up.
Image


Sadly the session was too short to go any further. I'll probably leave the welding clean up until after I've welded in the next section - whenever that happens to be...


On a side note, I got to use the tyre changer again at the weekend, in it's new 'low' state and it worked a treat. I've still got a bit of technique to hone, but I changed the front bike tyre, including balancing in about 2 hours. That includes the time to get the wheel off and back on the bike. It will get quicker with practice.


Top
   
Display posts from previous: Sort by 
Post new topic Reply to topic  [57 posts ]  Go to pagePrevious123456Next

All times are UTC


Who is online

Users browsing this forum: No registered users and 11 guests


You cannot post new topics in this forum
You cannot reply to topics in this forum
You cannot edit your posts in this forum
You cannot delete your posts in this forum
You cannot post attachments in this forum

Search for:
Jump to:  
cron
Powered by phpBB® Forum Software © phpBB Limited