The Camaro Club (UK)

Online Community for all Camaro Owners and enthusiasts
It is currently Tue Nov 26, 2024 11:10 pm

All times are UTC


Post new topic Reply to topic  [456 posts ]  Go to pagePrevious191011121346Next
Author Message
 Post subject: Re: '79 project
PostPosted:Mon Jan 21, 2013 2:59 pm 
Offline
Big Block
User avatar

Joined:Mon Feb 09, 2009 12:41 pm
Posts:2451
you've done a nice job there Ray, how long did it take? Did you pick those up when you went to NPD?

cheers...Nige

_________________
Too much power...not enough hands!!


Top
   

Re: '79 project

Sponsor

Sponsor
 

 Post subject: Re: '79 project
PostPosted:Mon Jan 21, 2013 3:56 pm 
Offline
Big Block
User avatar

Joined:Tue Feb 23, 2010 12:40 pm
Posts:3245
Car Details:'79 Camaro, 350 V8
Location:South Bucks
Thanks Nige :) I cleaned the frames and painted about 2 years ago :wtf: and they've been sat in the garage collecting dust since! The foam from them was sat in my room (only classic industries do the rear foam, but the cost of delivery was about $300 :shock: so didn't get new ones) , the covers are from NPD yes :thumbup: Cleaning the frame took about half day (i've got pics at home, will upload later), paint was done with the other black parts, and the recovering yesterday took about 4 or 5 hours. The cotton batten / wadding was an extra step i took, that used about half an hour. The original interior was tan and painted black, but was breaking up in areas and was slightly sticky / tacky when you sat on them, so not very nice lol.

_________________
How to post pics: When writing a message, scroll down and use the "attach file" option. Where possible, a photo sharing service can be used such as Flickr, Imgur etc. The image location (usually ending in .jpg) can be copy and pasted between the ][ brackets that appear when you click the 'Img' button (you can find this button at the top of the message box).

How to post youtube vids: Click on the 'youtubeHD' button at the top of the message box and in the middle of the ][ brackets that just appeared, copy and paste everything from the youtube web address that appears after the = sign i.e if this is the url: https://www.youtube.com/watch?v=K2cNqaPSHv0 just copy "K2cNqaPSHv0").


Top
   
 Post subject: Re: '79 project
PostPosted:Tue Feb 12, 2013 2:31 pm 
Offline
Big Block
User avatar

Joined:Tue Feb 23, 2010 12:40 pm
Posts:3245
Car Details:'79 Camaro, 350 V8
Location:South Bucks
Had a nice delivery yesterday, energy suspension (and moog) parts.. spring isolators to help give a bit of lift, heavy duty rear shackles and tie rod boots etc. Time to break open the front and rear suspension again! (what's that saying about do it right the first time...)

Image

_________________
How to post pics: When writing a message, scroll down and use the "attach file" option. Where possible, a photo sharing service can be used such as Flickr, Imgur etc. The image location (usually ending in .jpg) can be copy and pasted between the ][ brackets that appear when you click the 'Img' button (you can find this button at the top of the message box).

How to post youtube vids: Click on the 'youtubeHD' button at the top of the message box and in the middle of the ][ brackets that just appeared, copy and paste everything from the youtube web address that appears after the = sign i.e if this is the url: https://www.youtube.com/watch?v=K2cNqaPSHv0 just copy "K2cNqaPSHv0").


Top
   
 Post subject: Re: '79 project
PostPosted:Sat Mar 16, 2013 8:38 pm 
Offline
Big Block
User avatar

Joined:Tue Feb 23, 2010 12:40 pm
Posts:3245
Car Details:'79 Camaro, 350 V8
Location:South Bucks
Picked up a couple of goodies today.

The appears to be in good condition. It's been sat in the guys garage for around 15 years. It's got the usual waves, plus a dink near the fender end. There's also a couple of dips near the swage line by the moulding ( how does that chrome strip come off?).

The fender is in worse shape. The top of the wheel arch is pushed in by about 1/4 to 1/2" and then near where it meets the bumper it has had body work done. You can see it's been refinished from the cracking paint. It's rusted through too in some areas. Will be getting out the paint stripper on it tomorrow, i reckon it's mostly filler and not so much metal!

Image

Image

Image

Image

Image

Image

_________________
How to post pics: When writing a message, scroll down and use the "attach file" option. Where possible, a photo sharing service can be used such as Flickr, Imgur etc. The image location (usually ending in .jpg) can be copy and pasted between the ][ brackets that appear when you click the 'Img' button (you can find this button at the top of the message box).

How to post youtube vids: Click on the 'youtubeHD' button at the top of the message box and in the middle of the ][ brackets that just appeared, copy and paste everything from the youtube web address that appears after the = sign i.e if this is the url: https://www.youtube.com/watch?v=K2cNqaPSHv0 just copy "K2cNqaPSHv0").


Top
   
 Post subject: Re: '79 project
PostPosted:Mon Mar 18, 2013 12:25 pm 
Offline
Big Block
User avatar

Joined:Mon Jun 20, 2011 8:15 pm
Posts:120
Car Details:1970 Camaro RS 350/350
Location:Thatcham - Berkshire
Wow, just read through this thread, a lot of great work done here, fair play to you!


Top
   
 Post subject: Re: '79 project
PostPosted:Mon Mar 18, 2013 3:14 pm 
Offline
Big Block
User avatar

Joined:Tue Feb 23, 2010 12:40 pm
Posts:3245
Car Details:'79 Camaro, 350 V8
Location:South Bucks
Thanks Cowman, it sure has been a journey! Not as detailed by anymeans as your full surgical resto :) I would have liked to have gone to that depth but this is my first "serious" project and yank, so i'm in deeper than i expected. Ideally i would have liked to replace frame rails etc but the project was intented as learning process and it sure as hell taught me a lot (mainly about how little i know lol).

Waiting for the weather to be decent enough to tackle the door and fender, then i can finally be in with a fighting chance of getting er done :)

Cheers!

Ray

_________________
How to post pics: When writing a message, scroll down and use the "attach file" option. Where possible, a photo sharing service can be used such as Flickr, Imgur etc. The image location (usually ending in .jpg) can be copy and pasted between the ][ brackets that appear when you click the 'Img' button (you can find this button at the top of the message box).

How to post youtube vids: Click on the 'youtubeHD' button at the top of the message box and in the middle of the ][ brackets that just appeared, copy and paste everything from the youtube web address that appears after the = sign i.e if this is the url: https://www.youtube.com/watch?v=K2cNqaPSHv0 just copy "K2cNqaPSHv0").


Top
   
 Post subject: Re: '79 project
PostPosted:Mon Mar 18, 2013 6:39 pm 
Offline
Big Block
User avatar

Joined:Mon Jun 20, 2011 8:15 pm
Posts:120
Car Details:1970 Camaro RS 350/350
Location:Thatcham - Berkshire
Quote:
I would have liked to have gone to that depth but this is my first "serious" project and yank, so i'm in deeper than i expected.
Mine too! ;)

Keep up the great work.


Top
   
 Post subject: Re: '79 project
PostPosted:Wed Apr 10, 2013 3:39 pm 
Offline
Small Block

Joined:Thu Apr 04, 2013 12:00 am
Posts:5
Car Details:1979 gen 2 camaro, in bits at the moment, just fitted a 350. Needs lots of work.
Looks really good Ray, proper well done restoration.
Good work!
Alex


Top
   
 Post subject: Re: '79 project
PostPosted:Sun Jun 30, 2013 2:48 pm 
Offline
Big Block
User avatar

Joined:Tue Feb 23, 2010 12:40 pm
Posts:3245
Car Details:'79 Camaro, 350 V8
Location:South Bucks
Thanks Alex and everyone for all the supportive comments :) So once again time flies, what have i been up to?

Working on the fenders to get them ready for primer. They are in 80 grit now and filler applied where necessary to get the panel as close to straight as possible.

Door is straightened out... That was an interesting one. There was an area pushed in just under the chrome trim which you can kind of see in the pic. Quite hard to get to the back of these doors because of the side impact bar. Removed all the internals.. window mechanism etc so a bit easier. Managed to do the best i could do, to reduce the dented area in the middle. This was mostly done by off dolly hammering around the brow of the dent (which was almost at the bottom of the door and 'caressing' the high point and low point to meet in the middle. It's not perfect but way better. Looking like around 1-2 mm of filler will be needed to get it straight. Then because of that dent, the top half of the door was also distorted, from the handle to the middle (there was a secondary low spot on the upper part of the door, looked like a door ding). So worked that outwards but again, not perfect and will require some filler but a lot less than originally would have been needed. Then there was a 3rd dent, under the hand and under the swage line, where it looked it the door had swiped a bollard or something, had quite a sharp crease and was dipped in by about 5mm. It had been fillered, so i removed this and worked the dent out, but it was really difficult to get to as it was right up to where the door skin meets the frame. I ended up using a home my home made stud welder dent puller to get into the crease and pull it out. Unfortunately, it worked so well i didn't realise it be so compliant and over pulled, stretching the metal :( So when it got into the right shape, it was now oil canning. I managed to tackle this by placing a few spot mig welds at high heat onto the panel, placing immediately a wet rag on and grinding the weld off. Did this in 3 places and it was enough to relax the metal. The theory here is that when metal cools it shrinks more than it had expanded, i.e mig heat expanded it by 10%, cooling shrank it by 15%, so net difference is 5% shrunk area. Those numbers aren't correct, only for illustration purposes. That area now only needs around 2mm of filler compared to 5mm or so that was on there. Big thanks to Nige (Evilzee28) for all the help. I make it sound like i knew what i was doing :) But Nige guided me through the whole process and taught me about the mig weld shrinking tip (tried once before with propane / butane mix torch that you get from places like b&q but they don't seem to get enough concentrated heat into the area as they don't burn hot enough.

Also stripped the re-spray job off to find a nice gold factory colour, meaning the door matched the rest of that cars original paint :)

What's left now is to grind off the trim studs, sand it to 120 in order to apply the filler (tech sheet says that you can fill over factory paint if scuffed to 180, want to preserve the factory etch where possible as that stuff is gooood). Then that puts the car mostly into 80 /120 grit and i can then break out the 180 / 240 and get it into 320 ready for primer. I'm using high build primer so technically when the door is done i could degrease and paint, but i don't want to risk any shrinkage, so i don't mind taking an extra few days to work through the sanding grits.

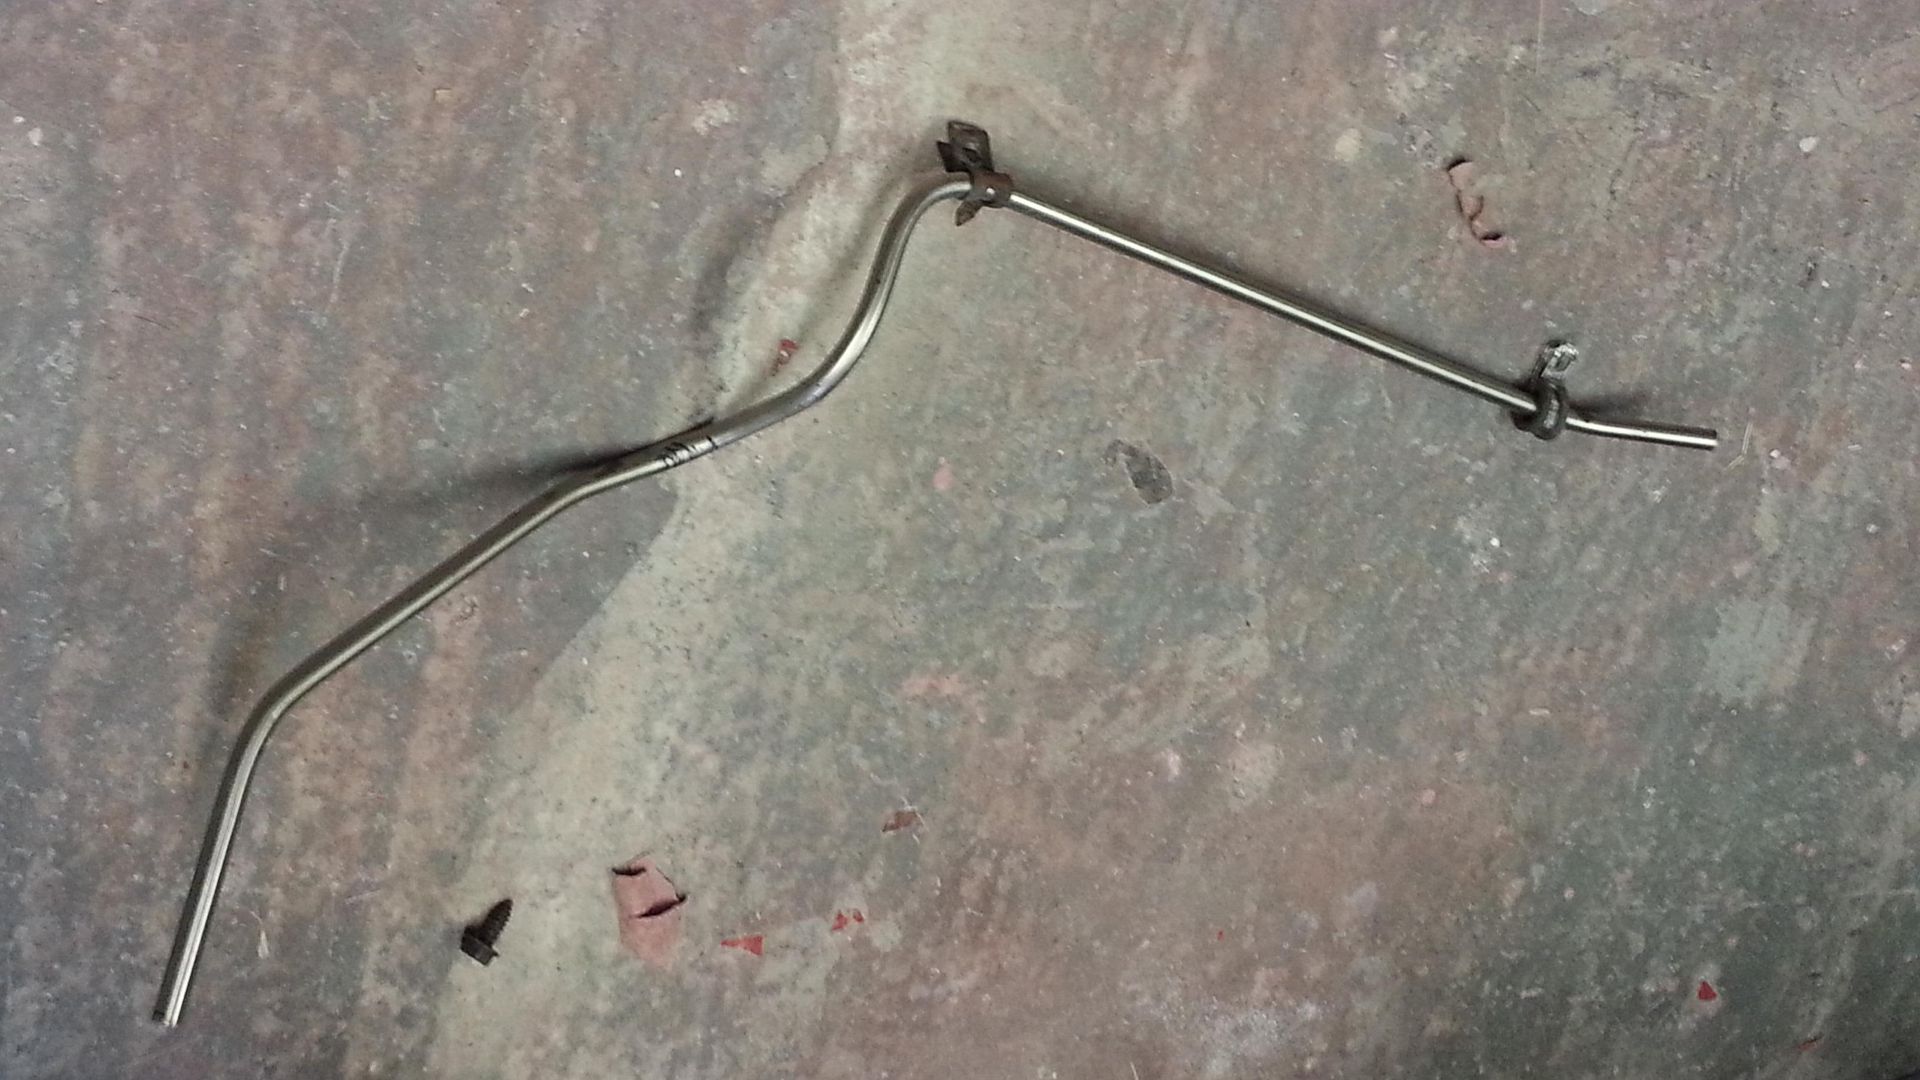
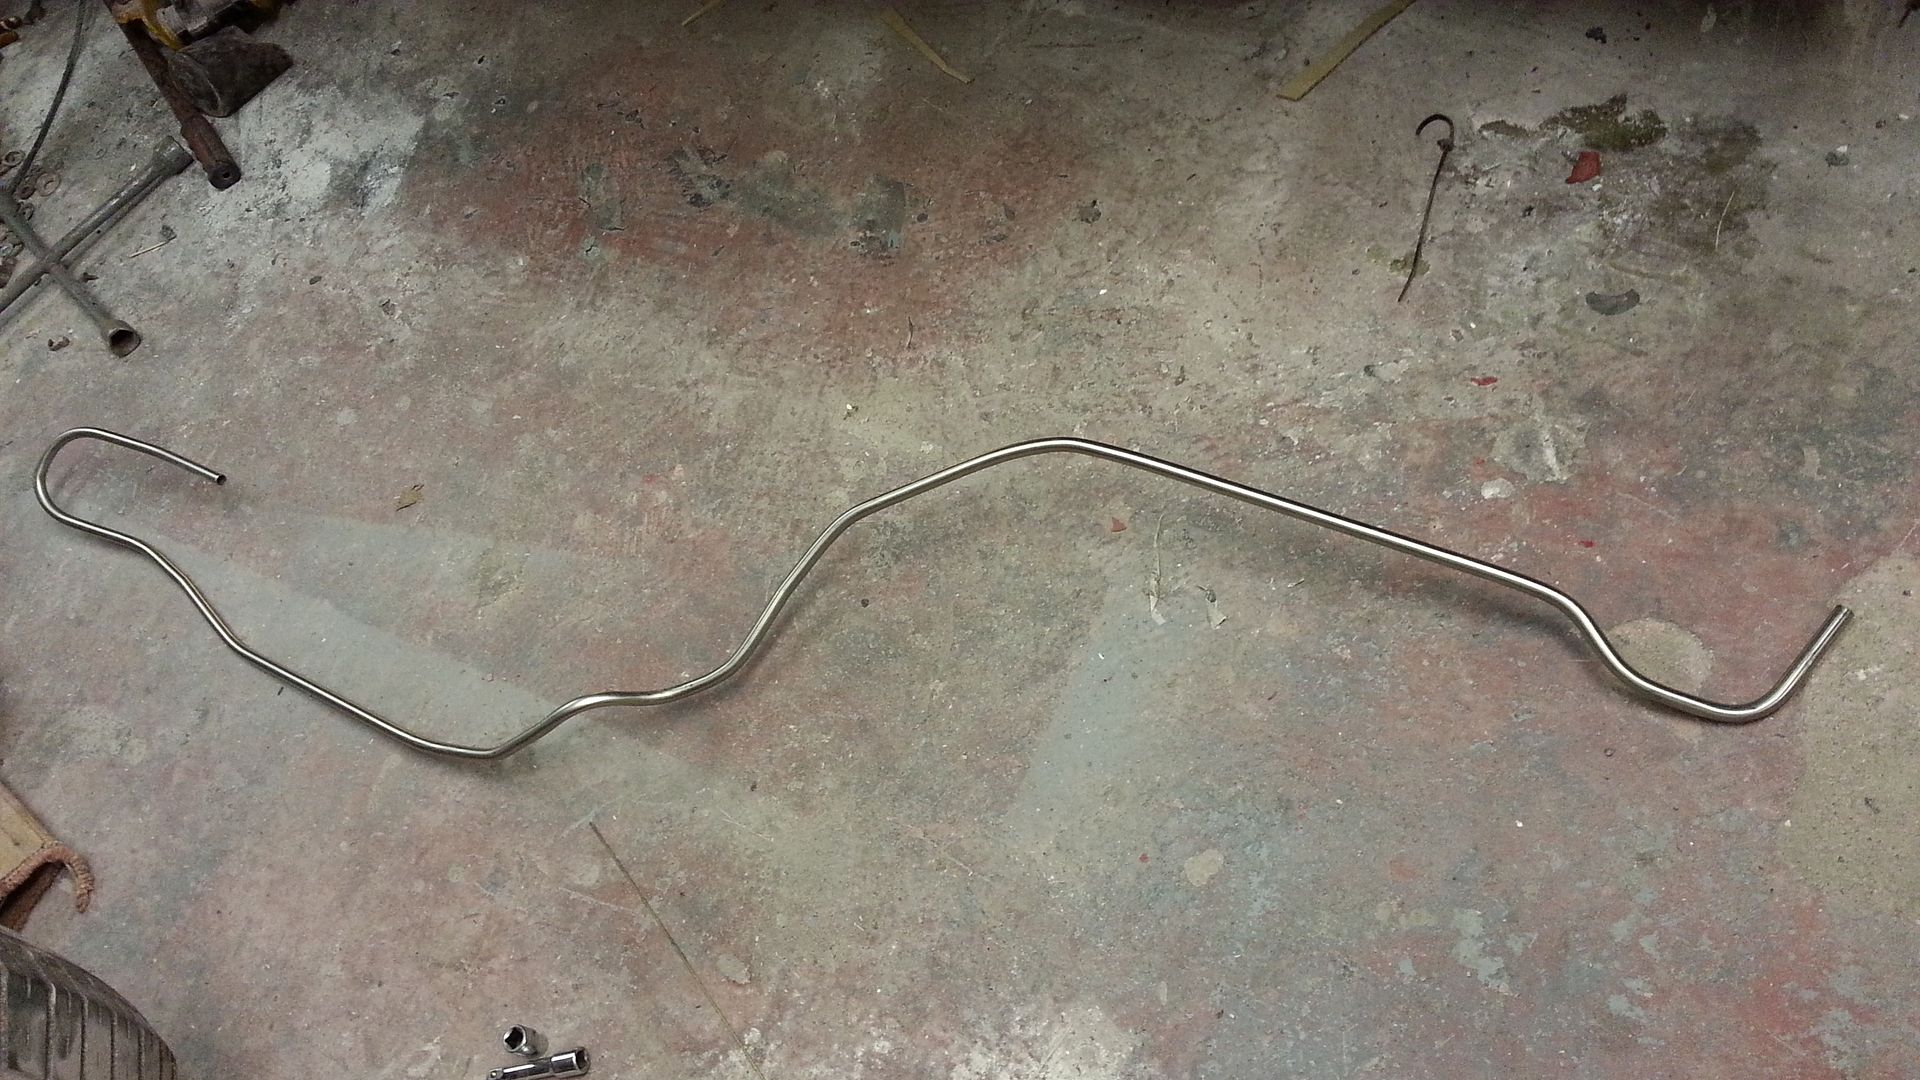
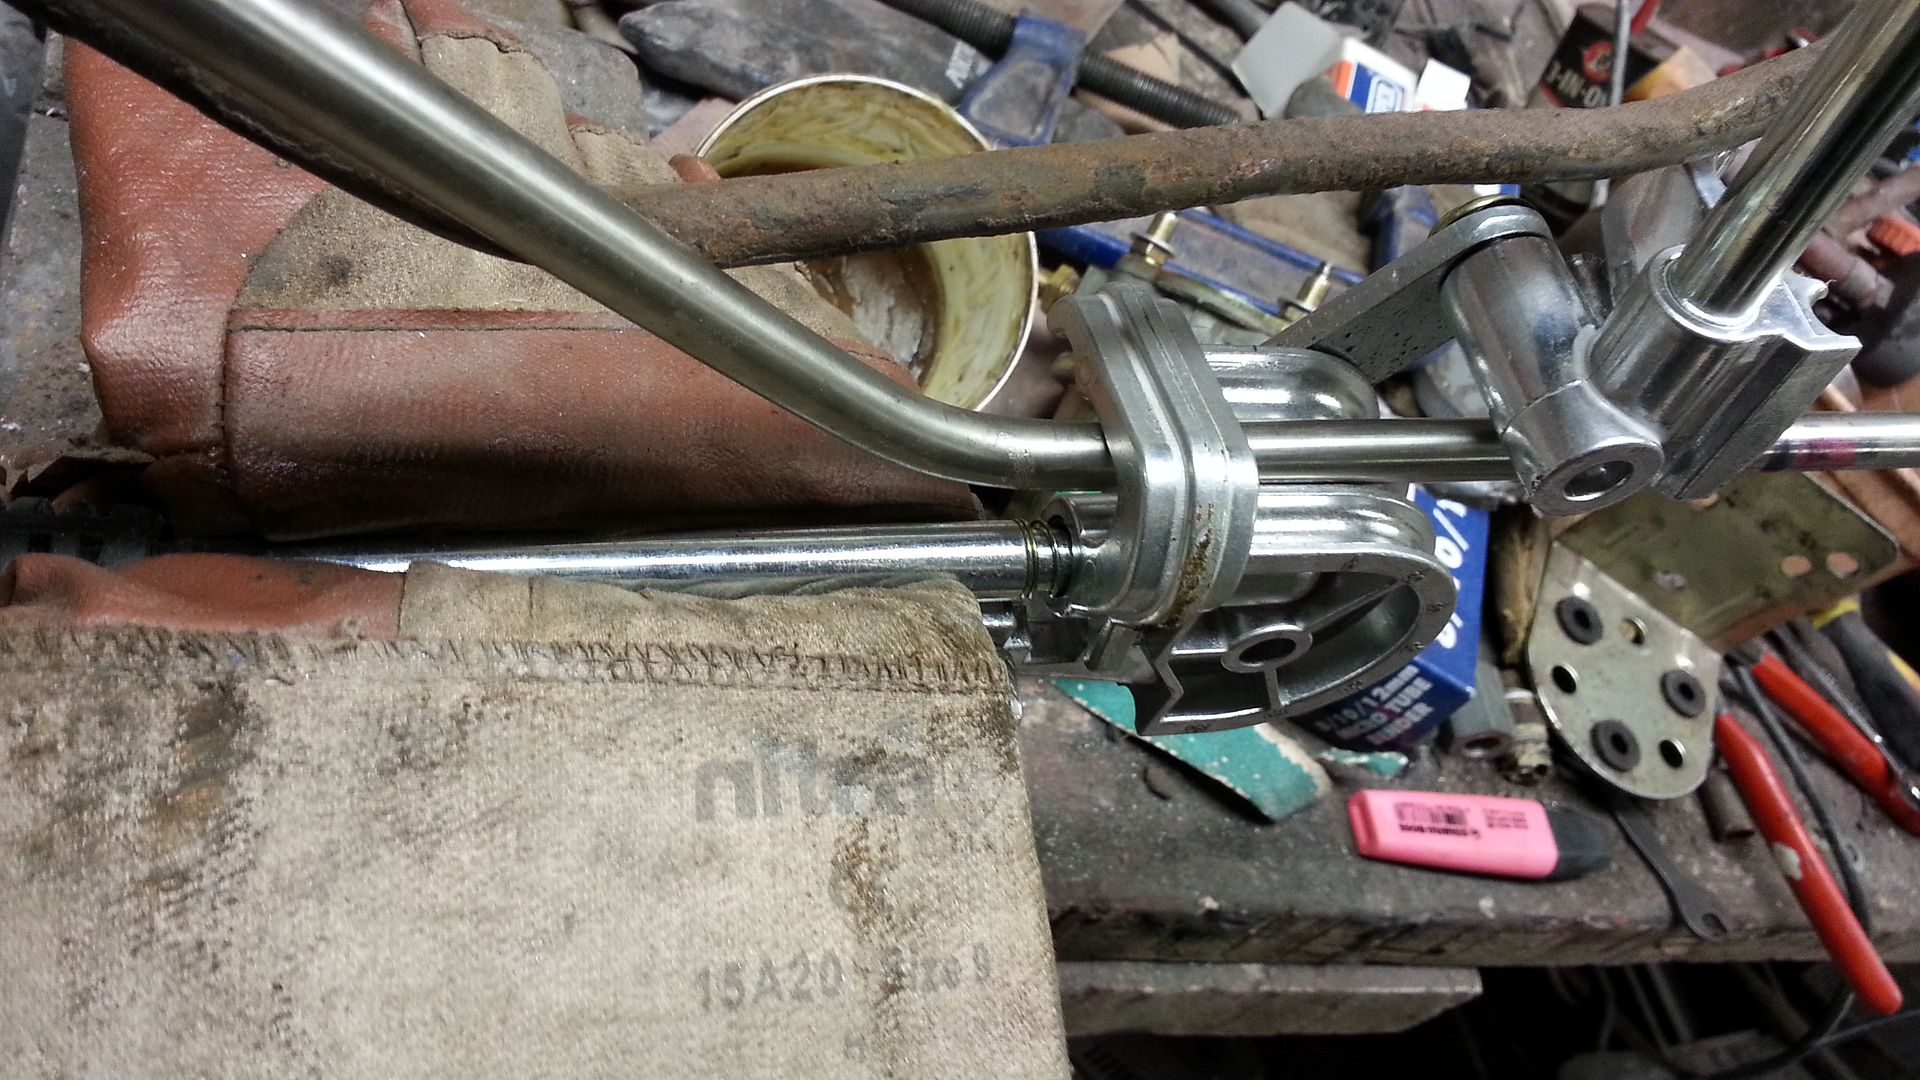
I've found working on one thing for a while causes depression / sad times so in i've stepped away from body work and changed tune to do some mechanical stuff. I made up new stainless steel tube fuel lines, fitted a fuel regulator (thanks Chevy Stu for the help & advice there) and they just need a quick clean to get rid of any dirt that ended up inside the tube. Was quite worried that i wouldn't be able to bend the 10mm outer, 8mm inner tube using a normal, affordable pipe bender. The ones that specifically stated Stainless Steel compatible are in the £80 - £130 and do only a specific size. So if you get a 3/8 one and you later need to do a 10mm ( 0.5mm difference) or a 1/4inch, you would need to buy another for the same price. Great if you do this regularly and make money from it, but no so much in this case. So i bit the bullet and risked a £12 one by Draper sold at my local toolstation. It did 8, 10 and 12mm. Surprisingly did a great job! I managed to get 90 degree bends without flattening the tube... when laying it side by side to the factory line, even the factory one had slight flattening, result! I did find way to help get good tube bends without flattening it... every 30 degrees or so, move the tubing forward a couple of mm's... it will give you a slightly larger radius, (only by a tiny bit) but it evens out the stress.

So i'm just installing the lines today (needed to wait for some hose clips and p clips to arrive). Also whilst in the engine bay, i've cleaned up a lot of wiring. It was a bit thrown together, lines crossing all over the place, so i re-routed a few things and it looks a lot tidier :) I got one of those spark plug wire arranger things that bolt to the valve cover and installed that too. I then removed each wire, cleaned it with a rag soaked in white spirit and the black leads i thought i had turned out to be blue! So a lot cleaner and tidier now, taking care of the OCD bug there.

Now for the more interesting part... pics!
Image

Image

Image

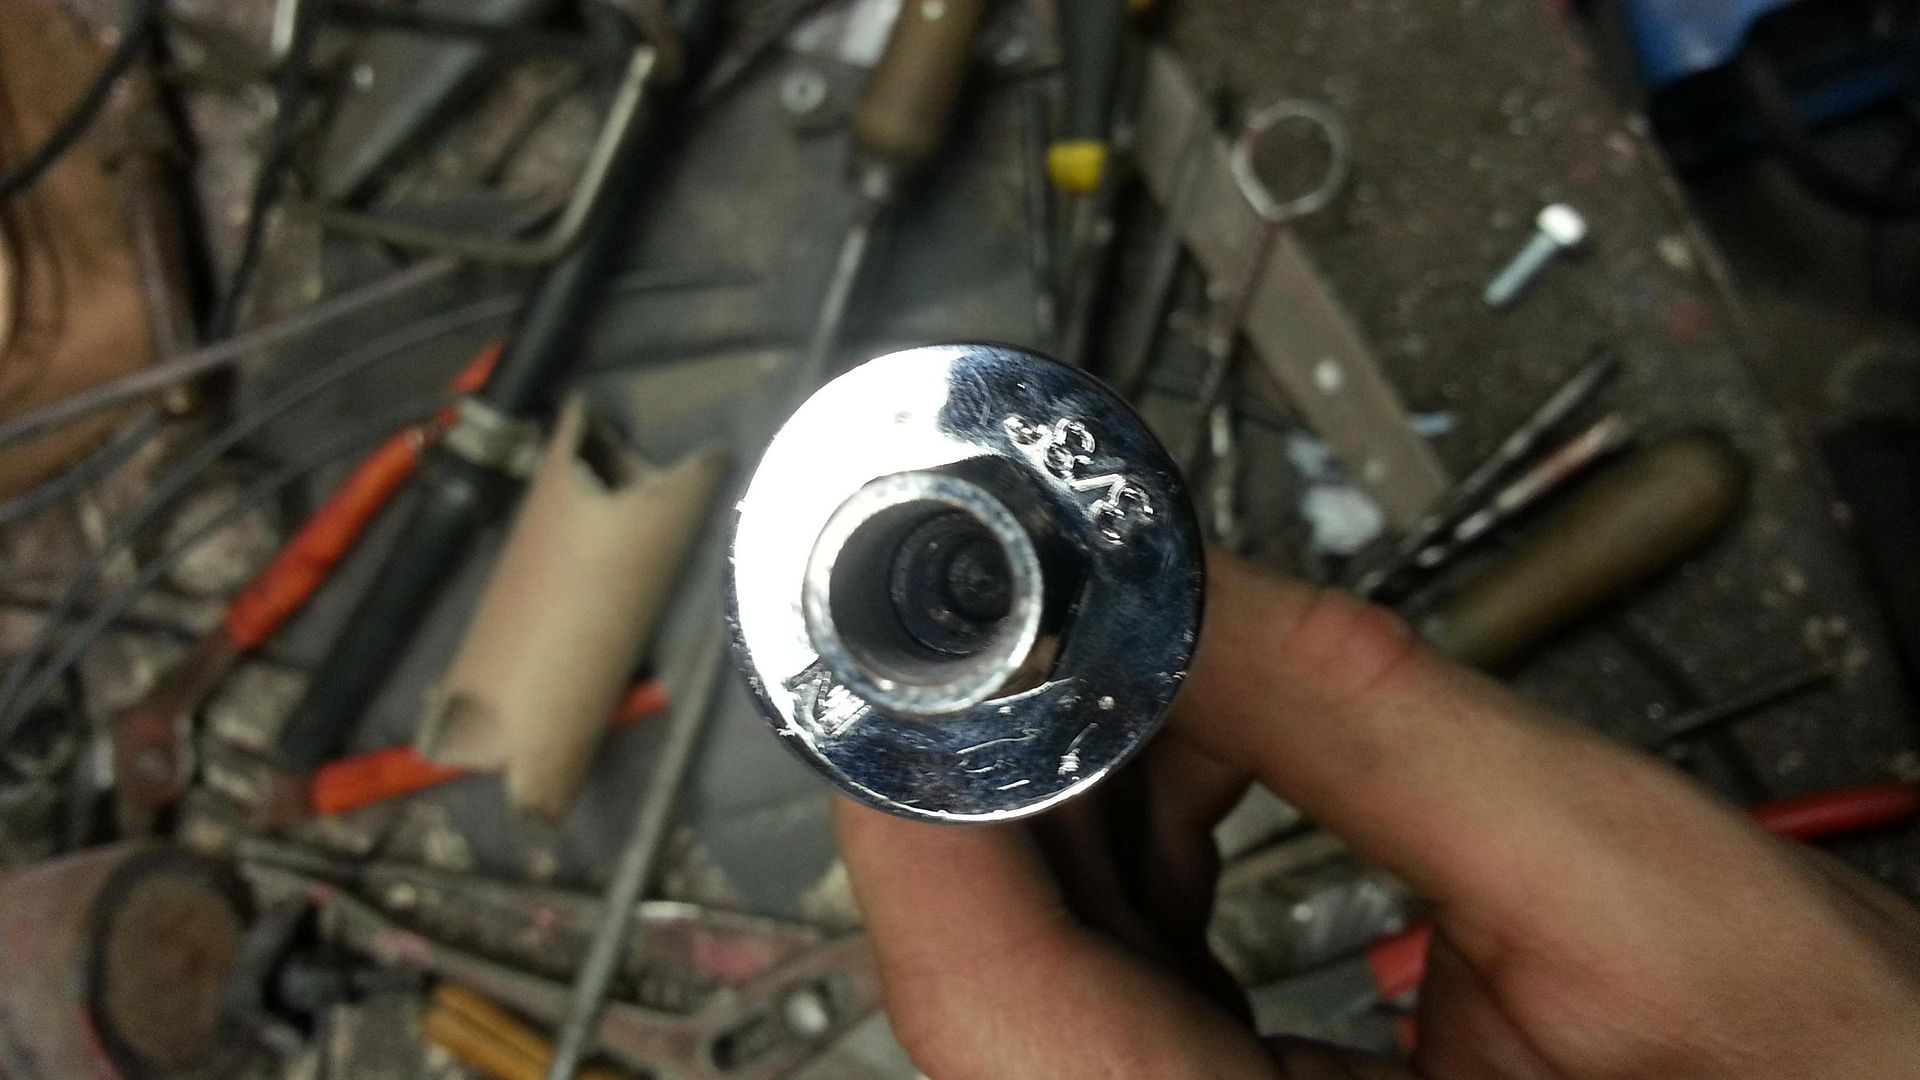
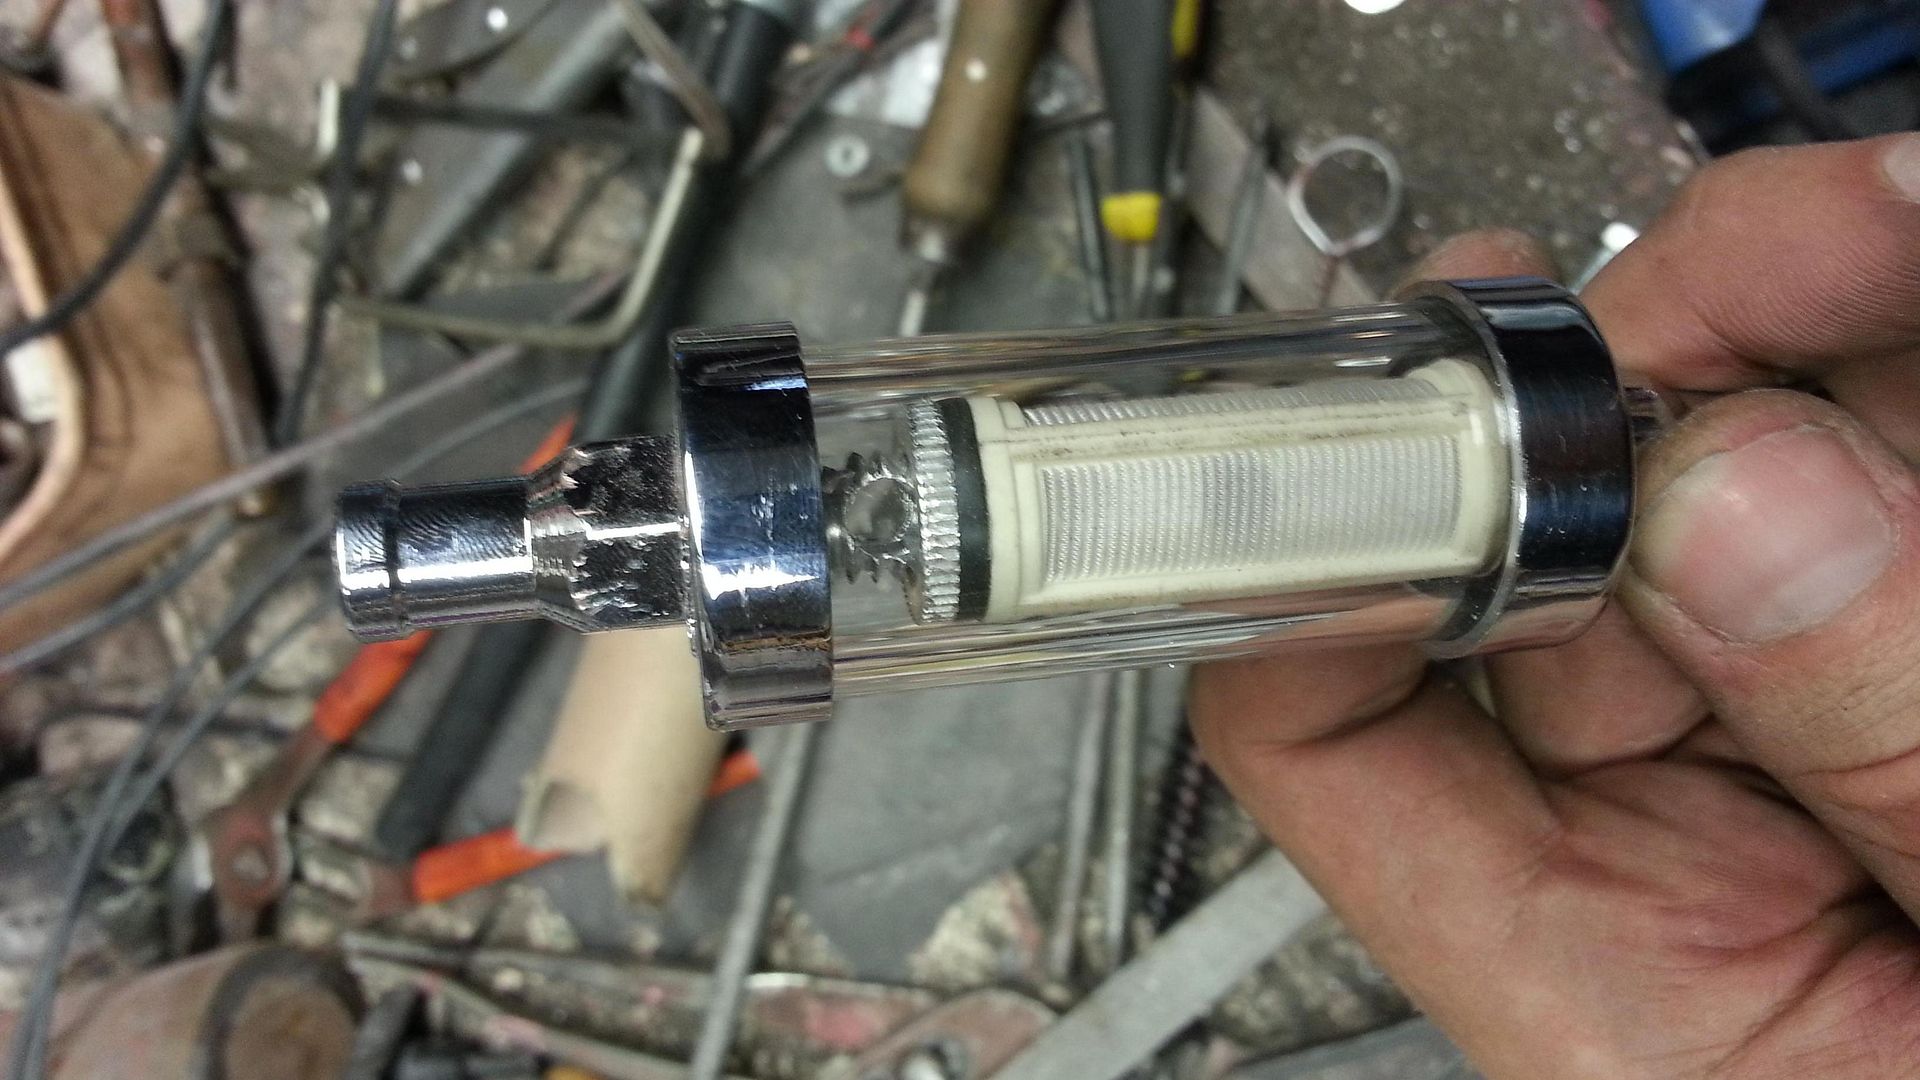
Also Bored out the fuel filter tubing as it's sold as being for 3/8" (9.5mm) tubing, which it is, but the internal diameter is a little under 1/4", so i bored it out 5/16th (8mm). I also then bored out the inside filter holes to ensure there was enough flow available. These are the reasons this build is taking so long :(

Image

Image

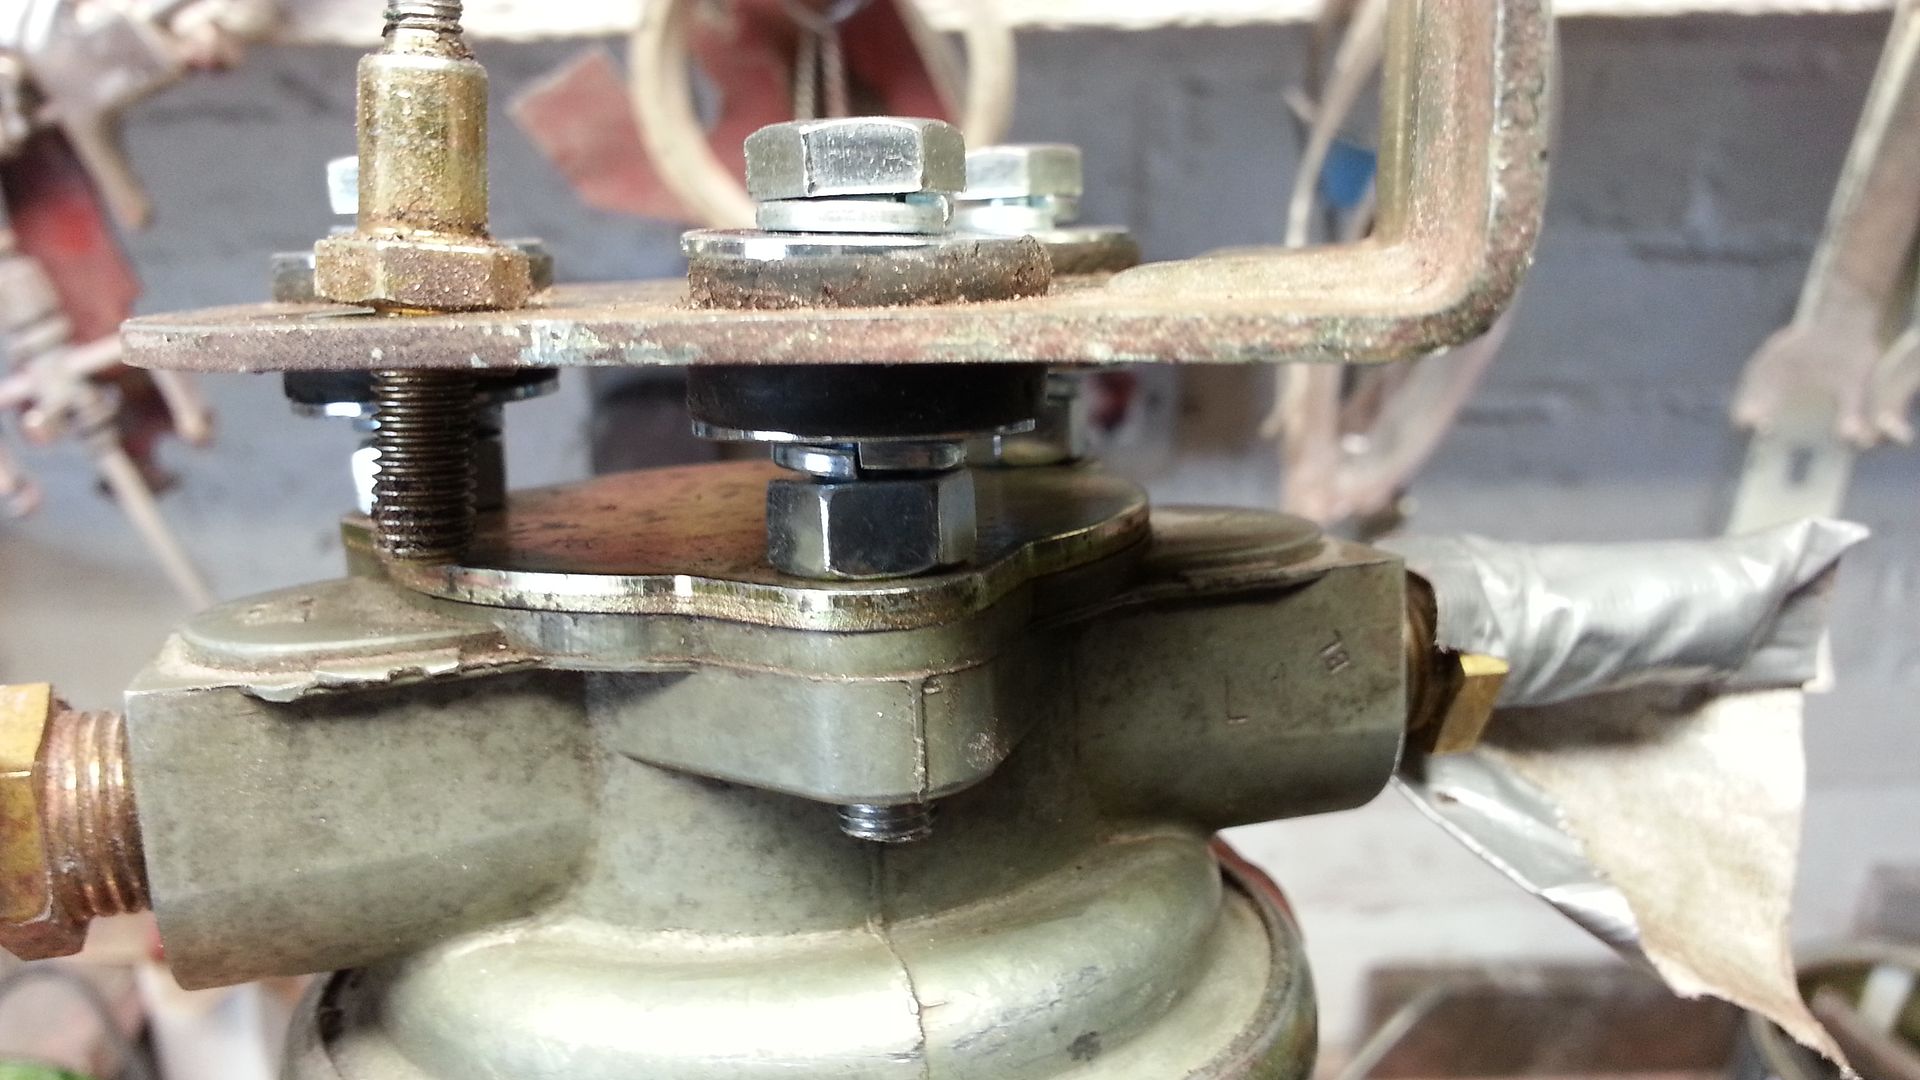
Oh yes, the Carter electric fuel pump was a little loose in it's bracket, so i investigated and turns out there was are different nut threads used on the top, so they were chewed up and couldn't be tightened. As you can see in the pic, the cadmium coloured bit is in there for reference. As it's quite a speciality bit, i made up my own version, using a 1/4 UNC bolt, some spring washers, regular washers etc to replicate the layout and it's solid now.
Image

_________________
How to post pics: When writing a message, scroll down and use the "attach file" option. Where possible, a photo sharing service can be used such as Flickr, Imgur etc. The image location (usually ending in .jpg) can be copy and pasted between the ][ brackets that appear when you click the 'Img' button (you can find this button at the top of the message box).

How to post youtube vids: Click on the 'youtubeHD' button at the top of the message box and in the middle of the ][ brackets that just appeared, copy and paste everything from the youtube web address that appears after the = sign i.e if this is the url: https://www.youtube.com/watch?v=K2cNqaPSHv0 just copy "K2cNqaPSHv0").


Top
   
 Post subject: Re: '79 project
PostPosted:Sun Jun 30, 2013 3:38 pm 
Offline
Big Block
User avatar

Joined:Tue Feb 23, 2010 12:40 pm
Posts:3245
Car Details:'79 Camaro, 350 V8
Location:South Bucks
Took advantage of the door being off by stripping the paint down to factory colour / primer, laying some epoxy primer down and coating it with the colour. Also while the door was off, stripped the inside down to factory, coated with epoxy and painted red.

Image

Image

Image

Image

Image

Image

_________________
How to post pics: When writing a message, scroll down and use the "attach file" option. Where possible, a photo sharing service can be used such as Flickr, Imgur etc. The image location (usually ending in .jpg) can be copy and pasted between the ][ brackets that appear when you click the 'Img' button (you can find this button at the top of the message box).

How to post youtube vids: Click on the 'youtubeHD' button at the top of the message box and in the middle of the ][ brackets that just appeared, copy and paste everything from the youtube web address that appears after the = sign i.e if this is the url: https://www.youtube.com/watch?v=K2cNqaPSHv0 just copy "K2cNqaPSHv0").


Top
   
Display posts from previous: Sort by 
Post new topic Reply to topic  [456 posts ]  Go to pagePrevious191011121346Next

All times are UTC


Who is online

Users browsing this forum: No registered users and 0 guests


You cannot post new topics in this forum
You cannot reply to topics in this forum
You cannot edit your posts in this forum
You cannot delete your posts in this forum
You cannot post attachments in this forum

Search for:
Jump to:  
cron
Powered by phpBB® Forum Software © phpBB Limited