The Camaro Club (UK)

Online Community for all Camaro Owners and enthusiasts
It is currently Sun Nov 24, 2024 7:03 am

All times are UTC


Post new topic Reply to topic  [647 posts ]  Go to pagePrevious191011121365Next
Author Message
PostPosted:Thu Nov 17, 2011 7:04 am 
Offline
Big Block

Joined:Thu Jul 21, 2011 2:16 pm
Posts:815
Car Details:1980 2nd Gen, 6.0 iron block LS, 4.11 12 bolt axle, Brute Strength Posi, Lowered 2", sub frame connectors, G-braces, Carbon hood and front bumper cover
Location:Norfolk
Quote:
That is a 78 or 79, based on the grille. In 1980/ 81 it changed to a horizontal, slotted type grill. The trim plate (your buddies called it a VIN plate, but it's not) will have all the trim, option & paint codes. If you get a chance, check beneath the sound insulation under the front carpeting ( usually the dirver's floorboard), or pull the upper part of the back seat out....you just might find the broadcast sheet (lists where & when the car was built, along with ALL the options it came with). ..that's essentially your car's birth certificate. Find THAT and you'll know exactly what it was the day it rolled off of the assembly line.
Dana
The car has been messed around a lot over the last 30 years and 17 owners.... there's no build sheet anywhere.

From the VIN and Trim tags its a 1980, originally painted metallic charcoal grey.

The start of the VIN is 1P87KAN

So...

Originally a 229ci V6 built 1980 in Norwood

_________________
My '80 progress thread - hugger orange! Now with LQ9 power - forged pistons, LS2 rods, 236/242, .621/.612, flowed and milled 317 heads. MS3X

4L80e, 12 bolt, 4.11, Moroso brute strength posi, steel shafts.

Subframe connectors, g-braces, solid body bushes, carbon hood and front bumper, custom door cards, Autometer gauges.


Top
   

Re: '80 Camaro mod project...

Sponsor

Sponsor
 

PostPosted:Thu Nov 17, 2011 12:53 pm 
Offline
Big Block

Joined:Thu Aug 11, 2011 2:10 pm
Posts:105
Car Details:Camaro phoenix project will rise soon enough
Quote:
Please tell me that's not a 4-banger in that F-body!! if it is, shame on you!!
no was a vaux chevette just need it for ref as to show what would be an alternative option to the rust troff


Top
   
PostPosted:Sat Nov 19, 2011 5:18 pm 
Offline
Big Block

Joined:Thu Jul 21, 2011 2:16 pm
Posts:815
Car Details:1980 2nd Gen, 6.0 iron block LS, 4.11 12 bolt axle, Brute Strength Posi, Lowered 2", sub frame connectors, G-braces, Carbon hood and front bumper cover
Location:Norfolk
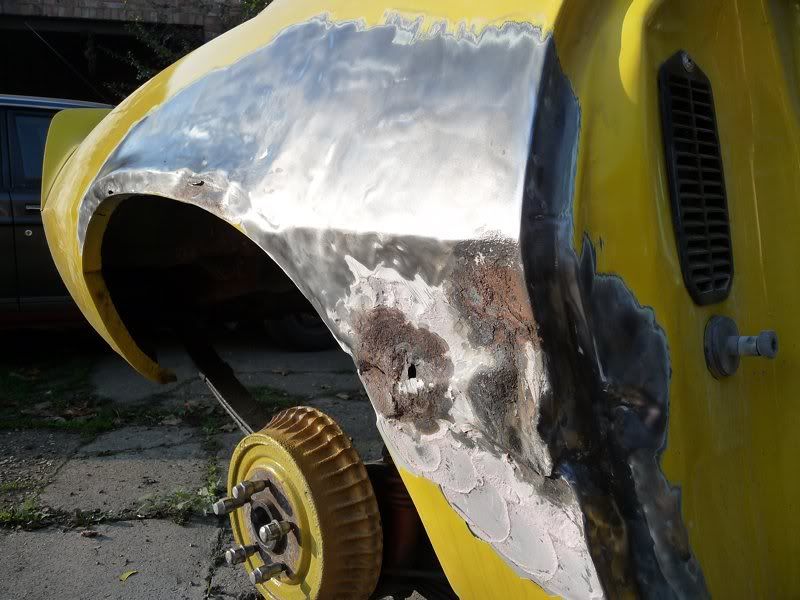
Finally made a start on the major panel replacements this afternoon. Started off by stripping the passenger quarter to bare metal, only to find it nearly 3/4" thick in filler in a lot of places. Its obviously had a prang on that side at some point, but it must have cost more in filler than a replacement panel :lol:

Image

Nothing that can't be sorted pretty easily though. Majority of the damage is being replaced by the quarter patch thats going in anyway. The rest I can fabricate bits to fix. Theres some rust in the bottom of the door pillar as well, but again a straight forward replacement job.

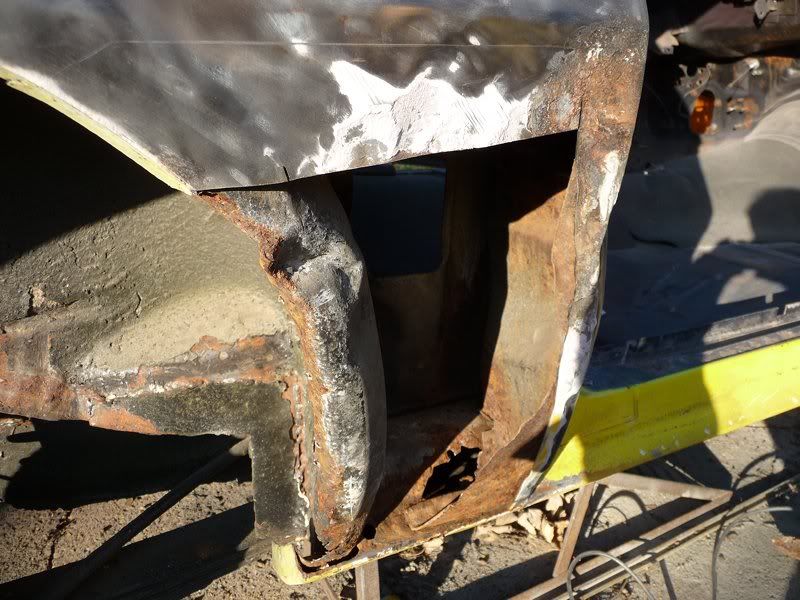
Cut off most of the quarter, will cut the rest off once the rocker is done as I needed some reference edges to make sure everything still lines up with the door afterwards!
Image

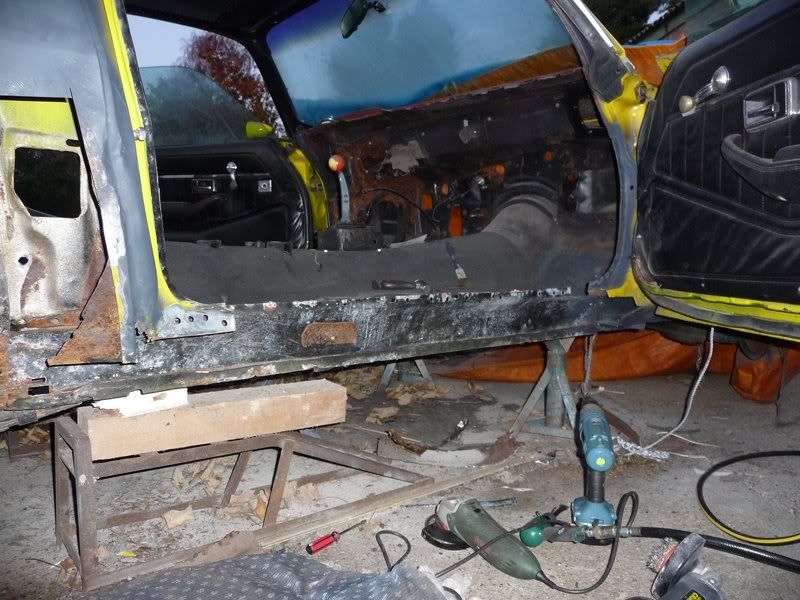
The good news is inside its all pretty solid. Flakey paint, but no serious rust. The hole is in the rocker panel, and its all gone already....
Image

Amazing what short work a spot weld cutter, air chisel and 0.8mm cutting wheel makes of a rocker :lol: Took around 3 hours to get this far today. I have cut the rocker out to the factory spot welds, as it was actually easiest to do that with the quarter off, than mess around seam welding it all. Just the lower outer to inner rocker seam to seperate in the morning.

To be honest the front 3/4 of the panel was OK anyway, it was only the back of it that was completely shot. But I figure I might as well do it properly in the first place :roll:

Tomorrow morning everything is getting a coat of epoxy paint first, then the rocker is going back on before the quarter.

Hopefully everything will line up... if not there will be much swearing! On my own tomorrow as well :lol:

_________________
My '80 progress thread - hugger orange! Now with LQ9 power - forged pistons, LS2 rods, 236/242, .621/.612, flowed and milled 317 heads. MS3X

4L80e, 12 bolt, 4.11, Moroso brute strength posi, steel shafts.

Subframe connectors, g-braces, solid body bushes, carbon hood and front bumper, custom door cards, Autometer gauges.


Top
   
PostPosted:Sun Nov 20, 2011 2:40 am 
Offline
Big Block
User avatar

Joined:Fri Mar 19, 2010 1:35 am
Posts:2566
Car Details:79' camaro road & track day toy. 383 stroker, 5 speed TKO trans, lots of suspension stuff, 13" Vette brakes, 18" wheels.
Location:Luton
I am constantly amazed at how much rust your 'looked pretty clean to begin with' car has... It's a real worry for other owners like me what's underneath mine..

Top work ,as always... :clap:

_________________
“You only live once, but if you do it right, once is enough.”


Top
   
PostPosted:Sun Nov 20, 2011 3:09 pm 
Offline
Big Block

Joined:Thu Jul 21, 2011 2:16 pm
Posts:815
Car Details:1980 2nd Gen, 6.0 iron block LS, 4.11 12 bolt axle, Brute Strength Posi, Lowered 2", sub frame connectors, G-braces, Carbon hood and front bumper cover
Location:Norfolk
Thanks Stu :)

Didn't get as far as I had hoped today. This morning was too cold and damp, so didn't really make a start until lunch time :(

Spent the first part of the day rebuilding the inner quarter as it had been damaged when the quarter was bashed, and it was also rusty around the bottom. Then spent a couple of hours making the new rocker fit properly. So didnt get around to painting everything until about 30 mins ago. I doubt it will be dry enough to fit until after its dark now.

But the good news is that the rocker seems to fit pretty well, lines up with the door as far as I can tell. Will take a little pulling into shape when its welded on, nothing too drastic though :lol:

Rust, be gone! Still need to patch the other part of the inner quarter, as I removed an old bodged patch. I'll be doing that after the rockers sorted.

Image

Image

_________________
My '80 progress thread - hugger orange! Now with LQ9 power - forged pistons, LS2 rods, 236/242, .621/.612, flowed and milled 317 heads. MS3X

4L80e, 12 bolt, 4.11, Moroso brute strength posi, steel shafts.

Subframe connectors, g-braces, solid body bushes, carbon hood and front bumper, custom door cards, Autometer gauges.


Top
   
PostPosted:Tue Nov 22, 2011 6:55 am 
Offline
Big Block

Joined:Sun Jun 19, 2011 8:10 pm
Posts:82
Car Details:1979 Z/28 / 408 CID/ M-22 / 3:73 Eaton Posi, yada, yada, yada
I'm one of those "US guys"who doesn't trust the other drivers. What I did do with mine was drill about 24 two-inch holes in the upper and lower horizontal planes. This took about 8lbs out of it and gives water somewhere to drain. On my core support, I did something similar with the drilling under the radiator, primarily for water and (heaven forbid) coolant to drain if there ever were a leak. You might consider this little modification, especially in the nice salt air over there...cheap rust prevention and it looks cool. ow, you sure put a lot of work into your core support. I'd have trashed it an ordered a repro, but that's easier to do here, I'm sure. Nice work on the rest, from what I've seen so far. Keep it up & good luck. If you can find a good powder coating shop, a lot of this stuff is easier to do if you go that route.
Dana


Top
   
PostPosted:Sat Nov 26, 2011 4:47 pm 
Offline
Big Block

Joined:Thu Jul 21, 2011 2:16 pm
Posts:815
Car Details:1980 2nd Gen, 6.0 iron block LS, 4.11 12 bolt axle, Brute Strength Posi, Lowered 2", sub frame connectors, G-braces, Carbon hood and front bumper cover
Location:Norfolk
Started welding on the new rocker yesterday afternoon and finished it off this morning. Drilled lots of holes for plug welds

Image

And it fitted a treat. Its a 'Golden Legion' rocker from NPD. At least as thick as the original and fitted with only a minor trim in a couple of spots.

Image

Image

Image

Then finished off fixing the inner quarter lip. Left it a little over length to be trimmed off later

Image

As far as painting everthing goes I am just etch primering any new metal at the moment to protect it, hence you still see old paint etc around the new repairs, and using 2k epoxy inside areas like the rocker where you can't access after repairs are complete. Once I have finished all the bodywork and structural stuff off I'll be stripping it all back to bare metal as much as possible and then using 2k epoxy to cover the whole underside of the car.

Final job for today was to left the engine out ready for it to be collected

Image

Image

Pretty painless even though I did it on my own :lol:

_________________
My '80 progress thread - hugger orange! Now with LQ9 power - forged pistons, LS2 rods, 236/242, .621/.612, flowed and milled 317 heads. MS3X

4L80e, 12 bolt, 4.11, Moroso brute strength posi, steel shafts.

Subframe connectors, g-braces, solid body bushes, carbon hood and front bumper, custom door cards, Autometer gauges.


Top
   
PostPosted:Mon Nov 28, 2011 2:55 pm 
Offline
Big Block
User avatar

Joined:Tue Feb 23, 2010 12:40 pm
Posts:3245
Car Details:'79 Camaro, 350 V8
Location:South Bucks
Very nice work! do keep these lovely updates coming!! Rocker panels turnout out great, look like stock (once in one colour of course :) )

What are you doing with the engine, rebuild? performance upgrade?

Cheers!

_________________
How to post pics: When writing a message, scroll down and use the "attach file" option. Where possible, a photo sharing service can be used such as Flickr, Imgur etc. The image location (usually ending in .jpg) can be copy and pasted between the ][ brackets that appear when you click the 'Img' button (you can find this button at the top of the message box).

How to post youtube vids: Click on the 'youtubeHD' button at the top of the message box and in the middle of the ][ brackets that just appeared, copy and paste everything from the youtube web address that appears after the = sign i.e if this is the url: https://www.youtube.com/watch?v=K2cNqaPSHv0 just copy "K2cNqaPSHv0").


Top
   
PostPosted:Mon Nov 28, 2011 5:20 pm 
Offline
Big Block

Joined:Thu Jul 21, 2011 2:16 pm
Posts:815
Car Details:1980 2nd Gen, 6.0 iron block LS, 4.11 12 bolt axle, Brute Strength Posi, Lowered 2", sub frame connectors, G-braces, Carbon hood and front bumper cover
Location:Norfolk
Thanks :thumbup:

Engines gone to a new owner thats going to rebuild it and stick it in a truck. I have a 350 ready to build up which should be making about 380-400bhp when its done. Its a while off being needed though :lol:

I had the day off work today so started working on the cowl area.

This was greeting me this morning when I went outside....

Image

According to my thermometer...-3 deg :lol:

Anyway, first job was getting the screen out. Removed the trim with a trim tool (would have been stuck without one!)

Image

Then thankfully whoever fitted the screen had mostly stuck it in with silicone, so a few well placed shoves and it came out in one piece. I was quite relieved to find the screen channel in very nice condition. All the pins are still in place for the trim clips, so thats one job I wont have to deal with. It just needs the bottom of the pillar rebuilding on the passenger side as I expected.

Image

Image

Image

Image

Image

The started drilling out what seemed like 100s of spot welds then cut the cowl panel into 2 bits, just for ease really. It granted nice easy access to all the rusty bits that need fixing. None of its particularly bad, but its easy to see why the water was running straight into the car.

Image

Image

Started off with fixing the hole on the passenger side, first as its got the easiest access of all. Ended up cutting a lot more away, but i just got this side done before it go too dark to carry on

Image

Image

Once all the repairs are done inside I'll coat all the welds and seams with seam sealer before giving it a good coat of epoxy paint. :)

_________________
My '80 progress thread - hugger orange! Now with LQ9 power - forged pistons, LS2 rods, 236/242, .621/.612, flowed and milled 317 heads. MS3X

4L80e, 12 bolt, 4.11, Moroso brute strength posi, steel shafts.

Subframe connectors, g-braces, solid body bushes, carbon hood and front bumper, custom door cards, Autometer gauges.


Top
   
PostPosted:Mon Nov 28, 2011 9:37 pm 
Offline
Big Block

Joined:Thu Aug 11, 2011 2:10 pm
Posts:105
Car Details:Camaro phoenix project will rise soon enough
thinking mine might look similar that "drainage" channel, surely there is a way of getting rid of it or at least boxing it over and putting air holes into the engine bay or similar?


Top
   
Display posts from previous: Sort by 
Post new topic Reply to topic  [647 posts ]  Go to pagePrevious191011121365Next

All times are UTC


Who is online

Users browsing this forum: No registered users and 3 guests


You cannot post new topics in this forum
You cannot reply to topics in this forum
You cannot edit your posts in this forum
You cannot delete your posts in this forum
You cannot post attachments in this forum

Search for:
Jump to:  
cron
Powered by phpBB® Forum Software © phpBB Limited