The Camaro Club (UK)

Online Community for all Camaro Owners and enthusiasts
It is currently Sat Nov 23, 2024 11:33 pm

All times are UTC


Post new topic Reply to topic  [647 posts ]  Go to pagePrevious15678965Next
Author Message
PostPosted:Fri Sep 09, 2011 8:34 pm 
Offline
Big Block

Joined:Thu Jul 21, 2011 2:16 pm
Posts:815
Car Details:1980 2nd Gen, 6.0 iron block LS, 4.11 12 bolt axle, Brute Strength Posi, Lowered 2", sub frame connectors, G-braces, Carbon hood and front bumper cover
Location:Norfolk
Lots of grinding and dismantling today.

Pulled out the whole interior, so I could lift the carpet out. Hadn't had a look under the drivers side until now and I was plesantly suprised by it being quite solid.

Image

Image

Some previous bad repairs, some fibreglass under the rear seat. All of which will be coming out and being done properly.

Also cut out the previous patches on the passenger side as they had just been put on the inside of the floor and the rot hadn't been cut out properly.

Image
Image

Seems to a lot worse than the drivers side. But I put that down to what I assume to be a water leak up at the base of the screen as there is some rust visible if you look up under the dash. So I will be taking the fender off after I have sorted the floor out and have a good look at the cowl/firewall.

I won't be fitting new floor pans, just patching the ones that are there properly as its all pretty straight forward stuff.

Whats less simple is sorting this mess out

Image

:roll:

_________________
My '80 progress thread - hugger orange! Now with LQ9 power - forged pistons, LS2 rods, 236/242, .621/.612, flowed and milled 317 heads. MS3X

4L80e, 12 bolt, 4.11, Moroso brute strength posi, steel shafts.

Subframe connectors, g-braces, solid body bushes, carbon hood and front bumper, custom door cards, Autometer gauges.


Top
   

Re: Should be picking my car up....'80 Camaro mod project...

Sponsor

Sponsor
 

PostPosted:Sat Sep 10, 2011 7:56 pm 
Offline
Big Block

Joined:Thu Jul 21, 2011 2:16 pm
Posts:815
Car Details:1980 2nd Gen, 6.0 iron block LS, 4.11 12 bolt axle, Brute Strength Posi, Lowered 2", sub frame connectors, G-braces, Carbon hood and front bumper cover
Location:Norfolk
More cutting today. Cut out the rot from the floor and set about patching. Just the toe board to finish off tomorrow if the weather isn't too bad.

Ended up cutting a big chunk of the floor out, and in hindsight it would have probably been better to replace the whole passenger side floor. But if it needs any more work in the future that would be the plan. I managed to replace the front section of floor with one piece of plate, which although time consuming should be better in the long run.

Image

Image

Image

The plus side is the rear subframe looked pretty solid from the top, as does the box where the rear front subframe bolt is.

Once the passenger side is done I will move on to the drivers side, which seems to be in a lot better condition. So hopefully won't take any where near as long.

I'll seam sealer all the welds top and bottom as well, then pull the shifter out and give the whole floor a coat of POR15 inside. That will be the main floor area sorted for another few years hopefully.

Then I just need to decide what to do with the poorly repaired floor under the rear seats. I don't think anyone makes those floor sections. Am I right? If not then It will be another big job for another day.

While poking around underneath I found a couple of small holes near the forward passenger side spring perch. If it all comes undone fairly easily it won't be a bad job.

As an aside, I would like to meet whoever invented underseal and punch them, right in the face....

_________________
My '80 progress thread - hugger orange! Now with LQ9 power - forged pistons, LS2 rods, 236/242, .621/.612, flowed and milled 317 heads. MS3X

4L80e, 12 bolt, 4.11, Moroso brute strength posi, steel shafts.

Subframe connectors, g-braces, solid body bushes, carbon hood and front bumper, custom door cards, Autometer gauges.


Top
   
PostPosted:Sun Sep 11, 2011 5:43 pm 
Offline
Big Block

Joined:Thu Jul 21, 2011 2:16 pm
Posts:815
Car Details:1980 2nd Gen, 6.0 iron block LS, 4.11 12 bolt axle, Brute Strength Posi, Lowered 2", sub frame connectors, G-braces, Carbon hood and front bumper cover
Location:Norfolk
Finished off the major work on the passenger floor today. Then set about scraping the underseal off the car. Thankfully most of it seems to come off very easily as its been put on without cleaning the floor. Hopefully I will get it all scraped off by the end of next weekend then I can get the underside steam cleaned and give it a proper coat of paint. I'll be leaving the front subframe for the time being as I will pull that off when the engine is out and will deal with that then.

There was a little more work lurking under the passenger toe board but nothing major

Image
Image

Gave it a coat of anti-rust paint inside for good measure as well while I was there... :lol:

Image
Image

The other side of the repair metal is already nice and clean, just need to wire brush the whole passenger floor then its ready for a coat of paint.

And the underside is pretty sound under the loose underseal. Most of it still has the original paint on it and is actually in really nice condition.

Image

Once its steam cleaned I will give it a good coat of paint, though I am not sure whether to use POR15 or not yet.

_________________
My '80 progress thread - hugger orange! Now with LQ9 power - forged pistons, LS2 rods, 236/242, .621/.612, flowed and milled 317 heads. MS3X

4L80e, 12 bolt, 4.11, Moroso brute strength posi, steel shafts.

Subframe connectors, g-braces, solid body bushes, carbon hood and front bumper, custom door cards, Autometer gauges.


Top
   
PostPosted:Mon Sep 12, 2011 10:02 am 
Offline
Big Block
User avatar

Joined:Fri Mar 19, 2010 1:35 am
Posts:2566
Car Details:79' camaro road & track day toy. 383 stroker, 5 speed TKO trans, lots of suspension stuff, 13" Vette brakes, 18" wheels.
Location:Luton
Wow, more patches there than a pirates bikers jacket...

You're making some great progress and good to see you're doing it properly and throughly. I wish I had done the same with mine as I feel I may have some more issues under the surface by now.
It's gonna be a solid car when you're done. Good the see the important stuff like the frame rails and subframe mounts are in decent condition..
I'd personally weld in subframe connectors while you're at this point, as it's one of the best mods you could do.

_________________
“You only live once, but if you do it right, once is enough.”


Top
   
PostPosted:Mon Sep 12, 2011 12:49 pm 
Offline
Big Block

Joined:Thu Jul 21, 2011 2:16 pm
Posts:815
Car Details:1980 2nd Gen, 6.0 iron block LS, 4.11 12 bolt axle, Brute Strength Posi, Lowered 2", sub frame connectors, G-braces, Carbon hood and front bumper cover
Location:Norfolk
Cheers Stu :)

The plan is to make it structurally solid before the winter as I have to work on it outside then worry about the cosmetic stuff next year. Sort of a start from the bottom up if you like. I know there is some rust around the rear screen to do, but thats a major job in its own right.

I was relieved to find the floor and frame rails fairly solid under the underseal. I do need to do some work on the rear rails and at the spring perches before the MOT, but it doesn't appear to be too serious at the moment. Until I pull it all apart at the back I don't really know what I have to look forward too... :lol:

I might look in to weld in SFC's as I was planning on using bolt in ones. I don't like the idea of welding them on at the front, so might have to do half and half.

_________________
My '80 progress thread - hugger orange! Now with LQ9 power - forged pistons, LS2 rods, 236/242, .621/.612, flowed and milled 317 heads. MS3X

4L80e, 12 bolt, 4.11, Moroso brute strength posi, steel shafts.

Subframe connectors, g-braces, solid body bushes, carbon hood and front bumper, custom door cards, Autometer gauges.


Top
   
PostPosted:Thu Sep 15, 2011 8:09 pm 
Offline
Big Block

Joined:Thu Jul 21, 2011 2:16 pm
Posts:815
Car Details:1980 2nd Gen, 6.0 iron block LS, 4.11 12 bolt axle, Brute Strength Posi, Lowered 2", sub frame connectors, G-braces, Carbon hood and front bumper cover
Location:Norfolk
Removed the inner fenders tonight. Wasn't actually too bad only had to cut a couple of bolts through.

Slowly pulling the whole front end off so I can get a good look at the cowl as there is some rust visible from inside the car. The plan being to make some temporary repairs for now, then get the screen pulled out and have the cowl/dash panel off to get inside properly. Plus there is some rust around the screen that needs seeing to anyway.

From what I can see so far it doesn't look to be too bad. Couple of little holes on the drivers side and just some surface rust on the passenger side to deal with once the fenders are off.

Image

Image

Image

Image

Tomorrow I'll get the fenders off and have a better look around. I know the passenger fender has been badly repaired along the bottom, so I may get a repair patch for that rather than messing around.

Lot more welding this weekend if the weather is good...! I just want to get a really solid shell as a basis before going too far with anything else.

I also have my poly bush kit for the body mounts too, so that will be going in before it all goes back together. :thumbup:

_________________
My '80 progress thread - hugger orange! Now with LQ9 power - forged pistons, LS2 rods, 236/242, .621/.612, flowed and milled 317 heads. MS3X

4L80e, 12 bolt, 4.11, Moroso brute strength posi, steel shafts.

Subframe connectors, g-braces, solid body bushes, carbon hood and front bumper, custom door cards, Autometer gauges.


Top
   
PostPosted:Fri Sep 16, 2011 8:28 pm 
Offline
Big Block

Joined:Thu Jul 21, 2011 2:16 pm
Posts:815
Car Details:1980 2nd Gen, 6.0 iron block LS, 4.11 12 bolt axle, Brute Strength Posi, Lowered 2", sub frame connectors, G-braces, Carbon hood and front bumper cover
Location:Norfolk
Well curiosity got the better of me and I thought I would do some more welding on the floor while the weather is OK. Though I am suffering with a damaged back at the moment, so progress is slow :lol:

Thought I would have a look under the filler under the rear passenger seat....and look what I found...

Image

Who the hell covers that with filler?! Just filler, no fibre glass....

Cut the floor pan away to uncover the frame rail near the spring pocket

Image

Getting better...

Then cut out the rusty parts of the rail and part of the inner wing that was rotten and started welding in new metal. Used 16swg for everything to match up with this part of the frame rail.

Image

Cut out some card templates and started repairing the rail. Did it in 2 parts just to make it easier

Image

Image

Image

Thats it for this afternoon, gave it a quick coat of paint ready for welding in a new piece of floor over the weekend.

Image

The good news is the rest of the rail looks to be in good condition, and I will be dropping the spring at some point when I change the bushes to have a more thorough inspection.

Going to get the passenger side to the same state tomorrow before welding in the patches on the floor.

_________________
My '80 progress thread - hugger orange! Now with LQ9 power - forged pistons, LS2 rods, 236/242, .621/.612, flowed and milled 317 heads. MS3X

4L80e, 12 bolt, 4.11, Moroso brute strength posi, steel shafts.

Subframe connectors, g-braces, solid body bushes, carbon hood and front bumper, custom door cards, Autometer gauges.


Top
   
PostPosted:Sat Sep 17, 2011 12:14 pm 
Offline
Big Block
User avatar

Joined:Fri Mar 19, 2010 1:35 am
Posts:2566
Car Details:79' camaro road & track day toy. 383 stroker, 5 speed TKO trans, lots of suspension stuff, 13" Vette brakes, 18" wheels.
Location:Luton
Quote:

Image
Eek... :o

_________________
“You only live once, but if you do it right, once is enough.”


Top
   
PostPosted:Sat Sep 17, 2011 6:23 pm 
Offline
Big Block

Joined:Thu Jul 21, 2011 2:16 pm
Posts:815
Car Details:1980 2nd Gen, 6.0 iron block LS, 4.11 12 bolt axle, Brute Strength Posi, Lowered 2", sub frame connectors, G-braces, Carbon hood and front bumper cover
Location:Norfolk
In the words of BTO.... You aint seen nothin' yet....

Thought as the repairs to the driver side wasn't too bad I would tackle the passenger side. And didnt actually get all that far before having to stop and think about the best method to continue.

Started off looking like this, patches over the top of rusty metal
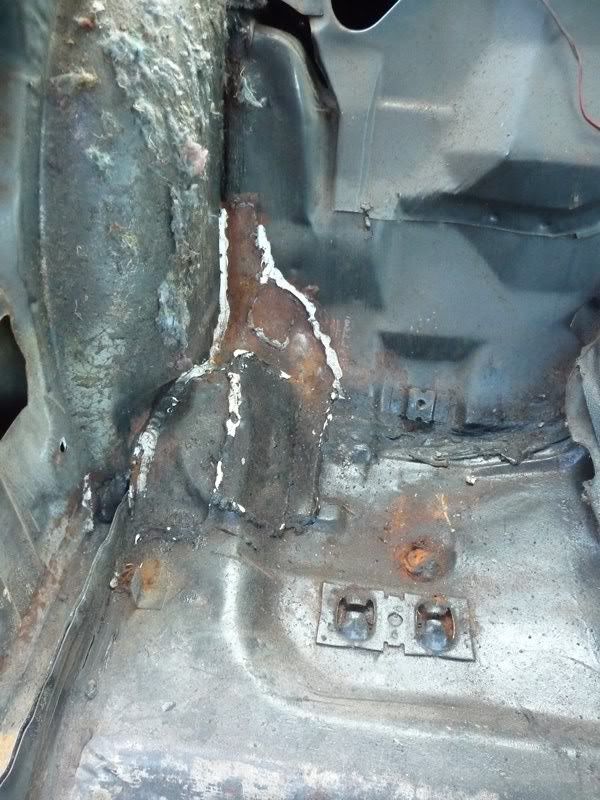
Image

To be fair it was well welded together, but it wasn't really achieving much other than providing a place for water to collect and the rot to spread.

Took an age with the grinder to carefully peel off the plates to find out what was salvageable underneath. Turns out I should have just hacked it out as there wasnt really much left after removing the rusty metal anyway.
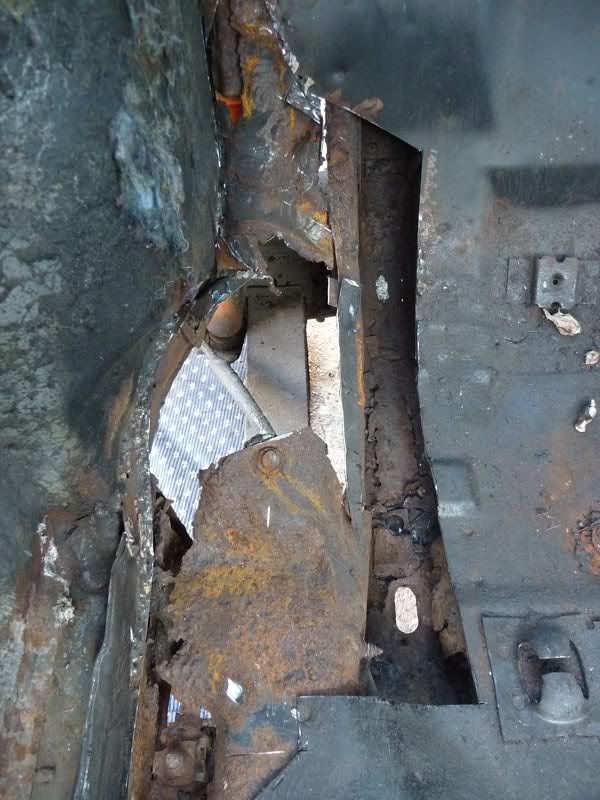
Image

Much worse than the driver side. Notice the nice rotten torque box and frame rail...?
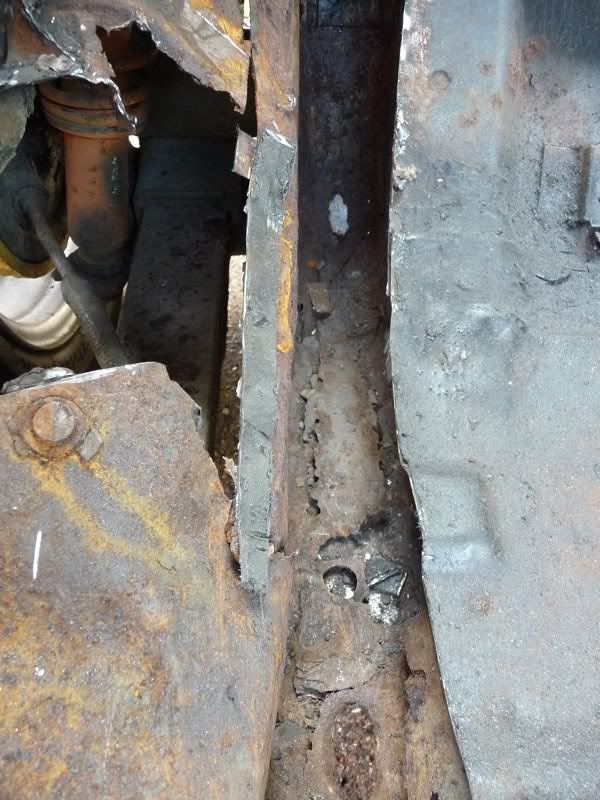
Image

The rail has been patched up from outside before with 18g metal. It looks like I am going to have to drop the leaf spring this side so I can get to the rail properly to cut off the previous patches and repair it properly. Not sure what thickness the rails themselves are, somewhere between 16g and 14g from measurements, but it seems to vary quite a lot.
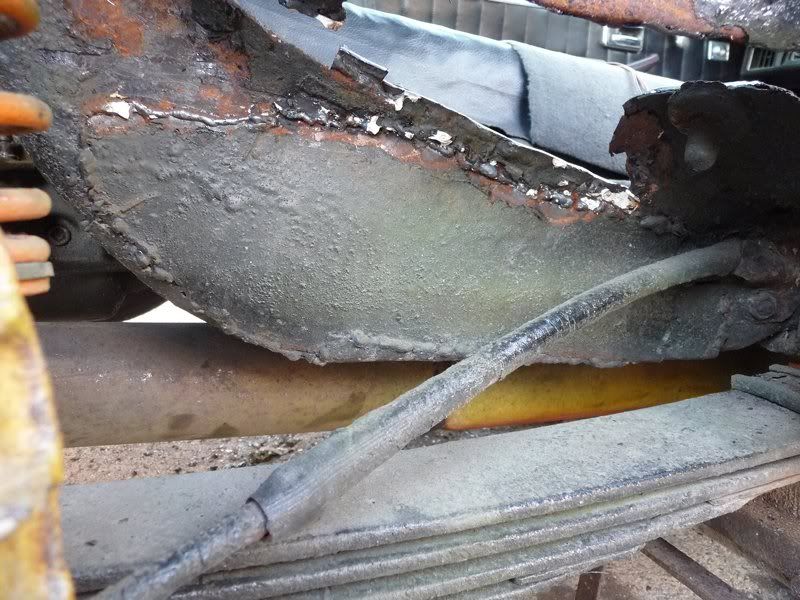
Image

I think its getting serious enough to break out the plasma cutter tomorrow.... :lol: :D But first I'll be making up some sort of brace to hold the frame somewhere near right while I repair it.

Its a real shame no one makes repair sections for the front of the frame rails would save a lot of grief.

Oh well, more cutting and welding tomorrow by the looks of it.

_________________
My '80 progress thread - hugger orange! Now with LQ9 power - forged pistons, LS2 rods, 236/242, .621/.612, flowed and milled 317 heads. MS3X

4L80e, 12 bolt, 4.11, Moroso brute strength posi, steel shafts.

Subframe connectors, g-braces, solid body bushes, carbon hood and front bumper, custom door cards, Autometer gauges.


Top
   
PostPosted:Sun Sep 18, 2011 12:43 am 
Offline
Big Block

Joined:Sat Oct 30, 2010 9:56 pm
Posts:268
Car Details:hi i have had my 70 z28 for bowt 5years now when i got it it needed a full resto an now am finaly geting to the end just have a few more bits to find and i cant wait till shes dne.
Location:north east
hi i see what you mean about that rear rail looks prity nasty i will get in touch with the bloke that owns the 79 shell and i will let you know what the bits are like thanks shaun.


Top
   
Display posts from previous: Sort by 
Post new topic Reply to topic  [647 posts ]  Go to pagePrevious15678965Next

All times are UTC


Who is online

Users browsing this forum: No registered users and 3 guests


You cannot post new topics in this forum
You cannot reply to topics in this forum
You cannot edit your posts in this forum
You cannot delete your posts in this forum
You cannot post attachments in this forum

Search for:
Jump to:  
cron
Powered by phpBB® Forum Software © phpBB Limited